


Snip & Sketch: Capture and edit screenshots like a pro
Windows 10 has always had a basic screenshot app (called the Snipping Tool) built in, but with the Windows 10 October 2018 Update, Microsoft introduced an enhanced screen capture and editing app called Snip & Sketch. You can launch it at any time from the Start menu or Action Center, but for greater efficiency, you can tell it to launch when you press the Print Screen (or PrtScn) key on your keyboard. Here’s how:
Launch the Windows 10 Settings app and click the Ease of Access icon. Scroll down the left column to the “Interaction” section and click Keyboard. Finally, in the main window of the Keyboard settings, scroll down to “Print Screen shortcut” and click the switch to On.
 IDG
IDG
Enabling Snip & Sketch screen capture from the PrtScn key. (Click image to enlarge it.)
Back on the main Windows 10 desktop, arrange the applications or other elements to how you want them to look in your screenshot. Then press the Print Screen key on your PC keyboard. A toolbar appears along the top-center of the desktop with the following four action buttons:
 IDG
IDG
The Snip & Sketch screen capture toolbar. (Click image to enlarge it.)
Rectangular Snip: This tool lets you select a rectangular area of the screen to capture. Click and hold down the mouse button, then drag the mouse to create a framed area that you want to capture. Release the button, and the framed area is captured and saved to the Windows 10 clipboard.
Freeform Snip: This tool works similarly to Rectangular Snip, but you draw freehand around the area of the screen you want to capture.
Windows Snip: This captures an application window. After you select this tool, click the application window you want to capture.
Fullscreen Snip: This captures everything you see on your desktop at the moment you click the Fullscreen Snip button. You can get the same result, and faster, if you press the Print Screen key twice in a row when you initially call up Snip & Sketch (thus skipping the need to click the Fullscreen Snip button on the toolbar).
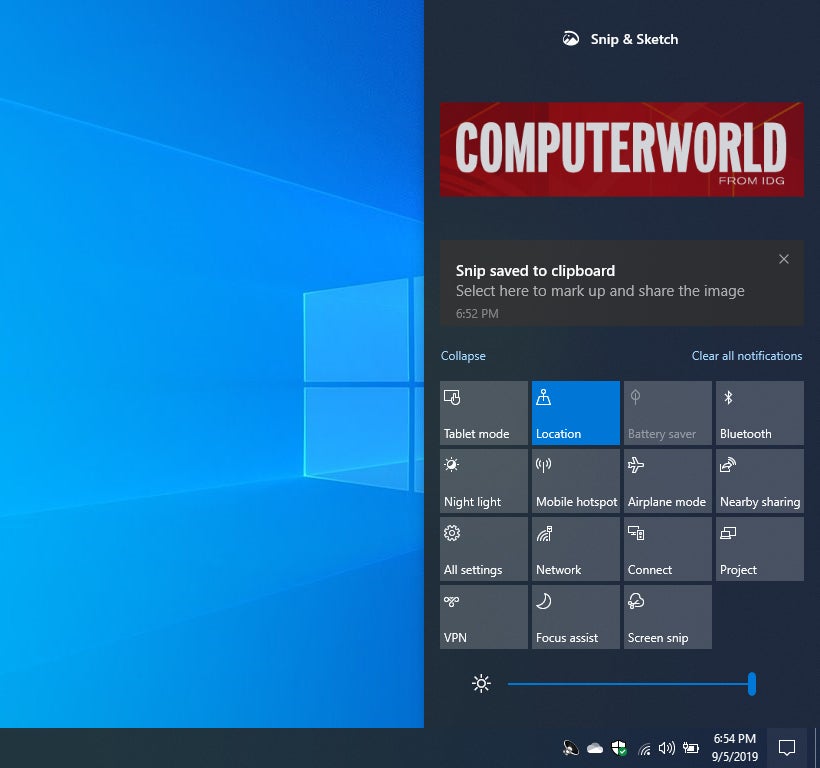
To view a screen image that you’ve just captured: Click the Notifications icon on the lower-right corner of the desktop. This opens the Action Center sidebar. A large thumbnail of the most recently captured image is shown at the top of the Action Center.
 IDG
IDG
Clicking Notifications displays the most recently captured image in the Action Center panel. (Click image to enlarge it.)
Click the thumbnail; it opens in the Snip & Sketch app. You can use Snip & Sketch to edit the image or, if the image doesn’t look quite right, you can take a new shot right from the Snip & Sketch window: Click the New button at the left edge of the toolbar to take a shot immediately, or click the down arrow to its right and choose to take the shot in 3 seconds or 10 seconds, giving yourself a little time to arrange the desktop or app window first.
 IDG
IDG
The image opens in the Snip & Sketch app with a range of editing tools available. (Click image to enlarge it.)
To edit the image, use the toolbar along the top of the Snip & Sketch app. You can mark it up with your mouse using ballpoint pen, pencil, or highlighter tools (with an array of colors available for each) or draw a straight line or a circle using the ruler/protractor tool. If you have a touch-screen device, you can select the Touch Writing tool and draw on the image with your finger or a stylus. You can erase any of your markup with the eraser tool and/or crop the image with the crop tool, then save the image in PNG, JPG, or GIF format.
Alternatively, you can launch another image editor that you prefer. To paste the captured image onto a blank canvas or over another image in the other editor (or to paste it into Word or PowerPoint), click the Copy button at the upper right of the Snip & Sketch screen, then place your cursor in the second application and press Ctrl + V to paste it.
Clipboard: Step up your copy/paste game
Speaking of copying and pasting, you’ve long been able to press Ctrl + C to copy a selected image or text and Ctrl + V to paste it. The Windows clipboard is what stores the copied item so you can then paste it into a document, a folder, or anywhere in Windows, really. But traditionally the clipboard could store only one item at a time; if you wanted to paste in anything prior to the most recent item you copied (or the most recent screenshot you took), you had to go back and recopy it.
The clipboard got a big upgrade last year in the Windows 10 October 2018 Update, and now it can do a lot more than simply store and paste the most recently copied item.
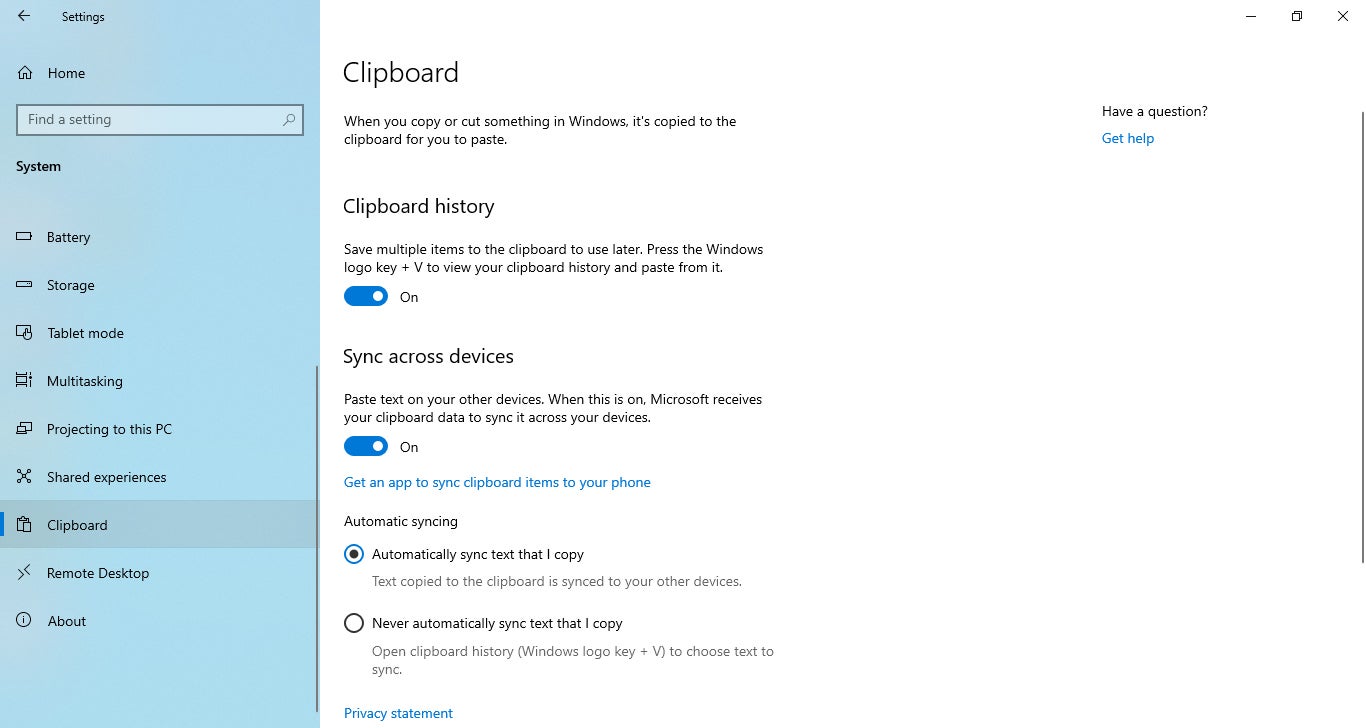
First you need to enable the enhanced clipboard. Launch the Settings app and select System > Clipboard. In the main window of the Clipboard settings under “Clipboard history,” click the switch to On. Now when you capture images or copy text, it doesn’t replace the previous item in the Windows 10 clipboard. Instead, it gets added to a list of these items.
 IDG
IDG
Enabling the enhanced clipboard in Settings. (Click image to enlarge it.)
Another setting to adjust on this screen: Under “Sync across devices,” click the switch to On. Items in the Windows 10 clipboard then become synced across any Windows 10 devices that you've signed into with your Microsoft user account. So if you copy an image or text on your Windows 10 work PC, you can access it from your Windows 10 home PC as well.
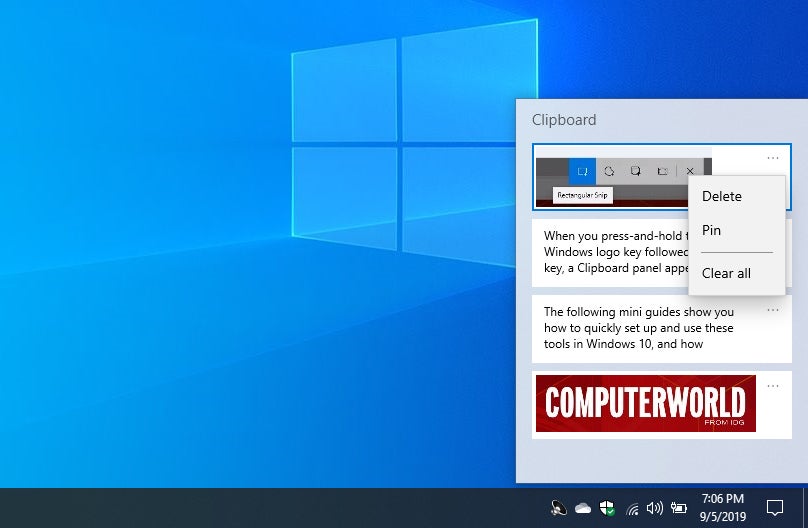
Once that’s done, you can still press Ctrl + C to copy an item and Ctrl + V to paste the most recently copied item in a word processor, image editor or other application. But you can alternatively press Windows key + V, and a Clipboard panel will appear to the right of where the mouse cursor is or at the lower-right corner of the desktop. Snippets of text that you copied or cut, as well as thumbnails of screen captures, are listed in this panel, with the most recent items toward the top. Just click on a text snippet or thumbnail to insert the item into the running application.
 IDG
IDG
The enhanced Clipboard gives you access to multiple items you’ve copied, not just the most recent. (Click image to enlarge it.)
To delete an item from the list (which you’ll want to do with sensitive material), click the three-dot icon next to it and select Delete from the menu that appears. You can also use the three-dot menu to pin an item to the top of the Clipboard panel or to clear all items (except pinned ones) from the panel.
On your smartphone: An upcoming version of the SwiftKey Keyboard app, which is owned by Microsoft and available for Android and iOS, will be able to sync your Windows 10 clipboard to it. Presumably, through SwiftKey, you’ll be able to access your Windows 10 clipboard to insert a copied text snippet or captured image into other smartphone apps, and to delete any of these items. Items that you delete from the clipboard via your smartphone will no longer be available from your Windows 10 PC either.