Part III: Device access
Step 10: Clean up your list of connected devices
Anytime you sign into a new device with your Google account — be it an Android phone, a Chromebook, or even just the Chrome browser on a regular PC — that device is added to an approved-for-access list and associated with your account.
Click over to this page in Google's security settings and give your list a once-over. If you see any old devices you no longer use, click on them and then click the "Sign Out" button that pops up to make sure they no longer have access to your account. And if you see any devices you've never used, remove 'em right away — and then go change your account password immediately.
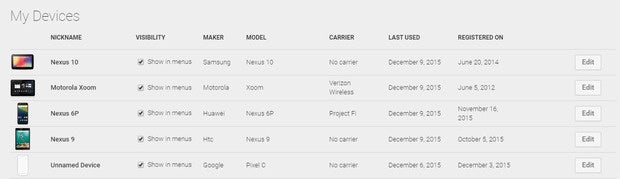
Step 11: Clean up your devices in the Play Store
This one isn't directly related to security, but it's a good bit of housekeeping to perform while you've got your cleaning hat on: Head over to the Google Play Store settings and look at your list of available devices. These are the devices that show up as options every time you install a new app from the Play Store web interface — and also the devices that show up as options in Google's Find My Device utility (more on that in a sec).
Go ahead and uncheck the box next to "Show in menus" for any devices you no longer use. And if you see any devices with cryptic codenames, click the "Edit" button alongside them and rename them to something you'll recognize.
 JR
JRThe next time you download an app or remotely locate one of your devices will be a much smoother experience as a result.
Step 12: Make sure your device is prepared for the worst
You might not realize it, but Google has its own utility for tracking, finding, and remotely wiping an Android device in case you ever lose it — and the whole system is built right into the operating system.
So what are you waiting for? Make sure all of your phones and tablets are enrolled now, before it's too late. Just head into the Google section of each device's main settings menu, tap "Find My Device," and make sure the toggle at the top of that section is activated.
Now bookmark the web version of Find My Device and/or download the app on a Chromebook or any other Android-compatible device you own. If you ever can't find your phone or tablet, open the service — or just do a Google search for "find my device" in any browser where you're signed in — and you'll be able to pinpoint precisely where the missing gadget was last seen. You can also force the device to ring as well as remotely lock it or erase the thing entirely.
Step 13: Think about whether you should be using a VPN
No matter how secure your Android phone itself is, someone could still snoop on your sensitive info if you're transmitting it over an insecure network. That's where virtual private networks, or VPNs, come into play: They encrypt all of your incoming and outgoing data so that no one could intercept it and see what you're doing at the network level.
VPNs aren't something everyone needs to worry about, but if you use your phone for a fair amount of business work or with any other type of sensitive material, it's something you ought to at the very least consider — particularly if you use a lot of open Wi-Fi networks, where snooping is especially easy to do.
So where to start? Well, first, some companies provide their own custom VPN services for employees. If that's the case for you, congratulations! You're already all set.
If you're using the Google Fi wireless service, the answer is similarly simple: Fi now provides an option to automatically encrypt all of your network connections via Google's VPN service. All you've gotta do is activate it.
Otherwise, you'll have to turn to a third-party Android VPN service in order to gain that added level of protection.
Part IV: Final considerations
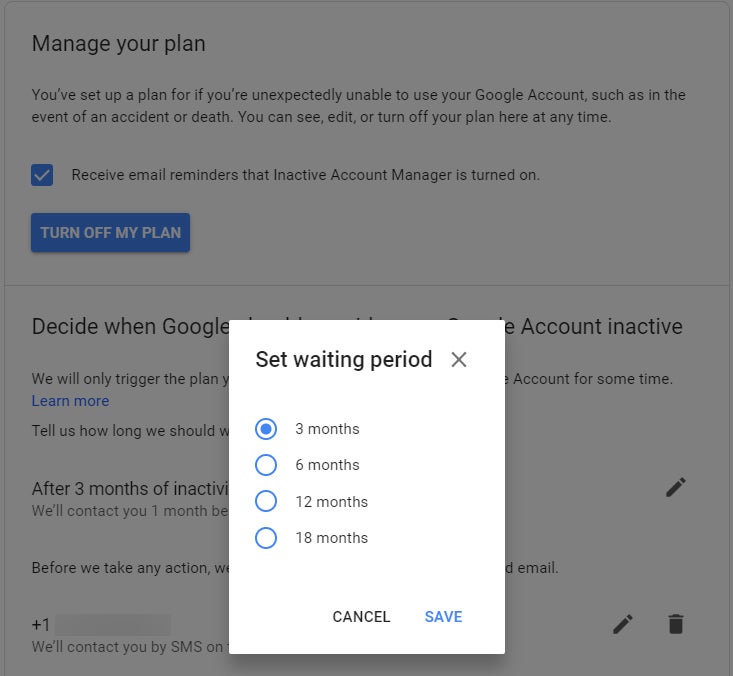
Step 14: Make sure you've done your virtual estate planning
We've got one more bit of "what if" preparation to address — and it's slightly unpleasant to think about: If something bad were ever to happen to you, would you want someone else to be able to access your Google account and all the data associated with your devices? Take a moment to prepare for that possibility now, and it'll make things infinitely easier for your friends or loved ones in the event that you ever develop a mild case of, erm, death.
It's actually pretty painless to do (the preparation, that is — not the death): Just go to this page and make sure you've set up Google's Inactive Account Manager. That system detects when your account has been inactive for a certain period of time — three months, six months, a year, or a year and a half, depending on your preference — and then notifies a friend or loved one of your choosing and provides them with whatever level of access you want. You can even set up an auto-reply to kick in for your Gmail (creepy!), and you can tell Google to delete your account altogether after a specific amount of time has passed.
Inactive Account Manager is designed to be extraordinarily cautious, with numerous fail-safes in place — including an option to try to contact you via SMS and email a month before your inactivity plan goes into action.
 JR
JR Some other services, including LastPass, offer similar systems for setting up emergency access to your account in an extreme situation. It's a weird part of security to consider, but — just like with every other area we've discussed so far — it's something worth thinking about and preparing for before the need arises.
Step 15: Perform a general Google security check to round things out
Take a deep breath: We're almost done! This next-to-last step will take you through a broad security check that'll look for any remaining weak points in your Google account and Android security and then prompt you to fix them right then and there.
Just go to this Google security site and click through any issues it presents. It'll confirm that you've successfully performed many of the actions we've already discussed and then look for any other potential red flags or opportunities for improvement.
Consider it your confirmation that your personal security setup is A-OK.
Step 16: Think carefully about third-party security suites
Last but not least: Now that you've made sure your Android security situation is shipshape, think about any third-party security suites you're using (whether you installed them or they came preinstalled on your phone or tablet) and what they're actually adding to your device. I'm talking Lookout, Avast, Norton, McAfee, AVG — all those sorts of programs.
You've already verified that your device is protected. Android is actively scanning for threats on several levels, both on the server side at the Play Store and on your phone as new apps arrive (from any source) and continuing over time. Plus, you're exercising basic smarts about what apps you download. The operating system is even looking out for SMS-based scams, and the Chrome for Android browser is keeping an eye out for web-based threats as well.
Beyond all of that, your devices are all enrolled in a sophisticated cross-platform system for remotely tracking, pinging, and erasing as needed. And all of that is happening on the native platform level.
So given those layers, is the third-party security suite on your phone doing anything that isn't redundant and unnecessary? It's probably eating up system resources and impacting performance for no real reason — and quite likely also costing you money you don't need to be spending — but is it actually accomplishing anything of value that Android itself isn't already handling in a more direct manner?
The answer is almost certainly no. If having an extra security layer makes you feel safer, hey, do what works for you. But if you've completed every step of this checkup, there's really no reason you need it — and every reason to send it packing. (To be clear, there are some privacy and security apps that could be worth your while; they just aren't the silly, bloated device-scanning suites that are so popular among folks who don't know better.)
And with that, my fellow Android-adoring security-seeker, your checkup is complete. All that's left is to set yourself a reminder to revisit these same steps next year. The areas we've just covered are constantly evolving, and giving yourself an annual once-over is the best way to ensure you're always in tip-top shape.
Get six full days of advanced Android knowledge with my free Android Shortcut Supercourse. You'll learn tons of time-saving tricks for your phone!