


Workplace collaboration tools are increasingly adding automation to their list of productivity features. Case in point: Slack last fall introduced the capability to easily automate repetitive tasks through a feature called Workflow Builder. Workflows act like macros to automate multiple steps — in most cases, collecting information and distributing it — using pre-built templates, after you import them into your team’s workspace.
Note: You’ll need a Slack paid plan — Standard, Plus or Enterprise Grid — to take advantage of Workflow Builder. If your organization has a paid account, any member of the team can create new workflows. And any other member can use the workflow once it’s completed, including members of other teams — and other organizations using a shared channel. One more caveat: The admin for your workspace needs to allow workflows, so check first to see if they’re allowed under your security settings. The feature is on by default, but admins can restrict access completely or by team member.
So, let’s take a look at how to automate common tasks and processes in Slack. We’ll focus on using pre-built templates provided by Slack, and then also quickly look at creating a new workflow from scratch. Even the template workflows can be customized, so it’s likely they’ll do what you need.
Status updates
Why not take a fresh look at the morning meeting? Whether it’s a standup or video call, it can take time away from actually getting work done. What if you could, instead, simply create a batch process in Slack, and have a list of what everyone’s working on pulled together automatically and distributed? That’s exactly what the “Progress updates” Slack workflow template delivers. Here’s how to install and customize it.
First, from your web browser, head over to Slack’s list of workflow templates on the web or download the Status Update template directly from here and save it in your Downloads folder or somewhere else where you can find it later.
Then, open Slack. At the top-left of the screen, click your workplace name, and select Workflow Builder. (Again, this feature is available only for paid subscribers, and you won’t see this menu item in a free account.) The Workflow Builder pop-up menu appears. Click Import, navigate to the workflow you downloaded earlier to your hard drive — it’s called project_status_update-workflow.json. Then click Open to import the workflow into your Slack workspace. Name your workflow and click Next.
The workflow is almost ready to go, but needs a little customization, then you’ll need to publish it so your coworkers can use it.
First, from the Actions menu at the top of the screen, click Edit, then select the channel where the workflow will be used. Click Save.
 Slack
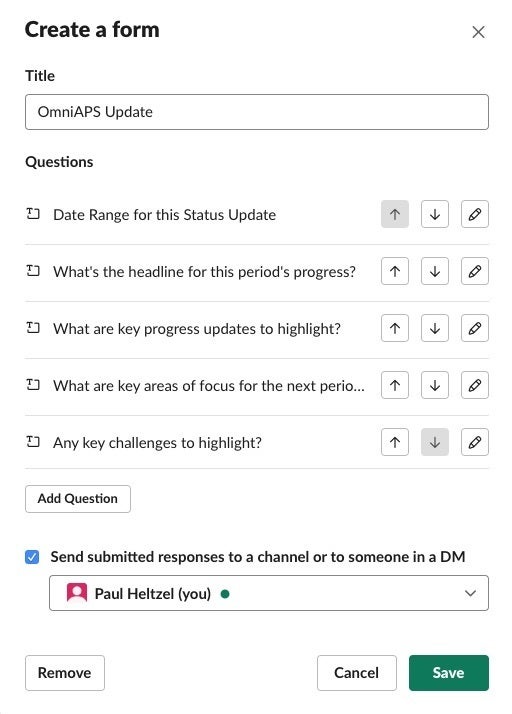
SlackThe Project Status workflow has some boilerplate questions, which each user will respond to when they create their update. These sample questions are easily changed. Under Create a form, click Edit. Click the pencil icon next to a question you want to change, and you can replace the existing text. Or click Delete to remove a question completely from the form. You can also add questions or rearrange the order by clicking the up/down arrows next to each question. When you’re done editing the questions, click Save.
To complete your customization, choose whether you want everyone in a channel to see the progress updates when they’re submitted, or have them instead sent to one person on the team (like your boss). In the Send a message area, click Edit.
From the Send a message menu, you can choose to send it to anyone who clicks Share Status Update from the Actions menu, to one team member or to an entire channel. Make a selection and choose Save.
 Slack
SlackNow, to enable your new workflow, click the Publish button at the top of the Workflow overview screen. Now your coworkers can send their updates by choosing the Actions menu in the channel where you choose the workflow to appear, selecting Share Status Update, filling out the form, and clicking Submit. A heads up: If you — or a coworker — haven’t added any actions to a channel, the Actions menu won’t appear until you do.
Welcome on board
Another potentially time-saving workflow template is the Slack onboarding workflow. You can use it to automatically send a direct message to a team member who joins a channel. In addition to using it for onboarding a new employee, for example, the automated message could lay out ground rules for a channel, link to frequently asked questions, or point to helpful online links or other resources, including pinned messages.
You can download the Onboarding workflow here or from Slack’s Workflow Examples page.
To get started, open the Workflow Builder by clicking the arrow to the right of your workspace name. Choose Workflow Builder, then Import.
Then choose which channel the bot should run in. Under New channel member, click Edit. Select a channel and click Save.
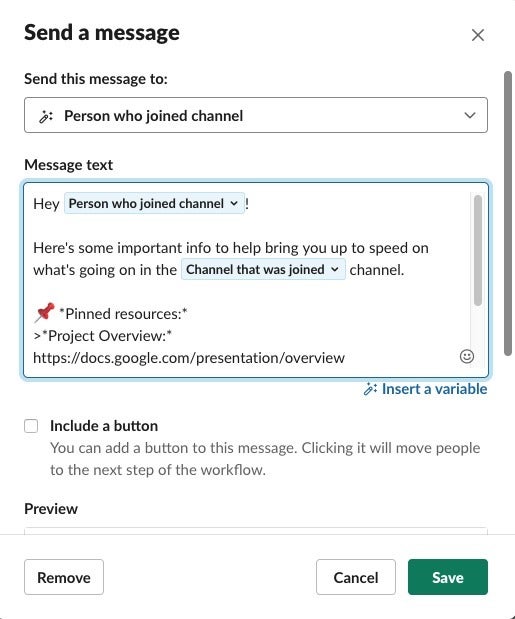
From the Send a Message area, click Edit. Then edit the new user message to suit your needs, and copy and paste any links that will help get the new team member up to speed. Click Save.
By default, the Onboarding workflow prompts the user to fill out a form where new users can introduce themselves. Just replace the text to customize it to your liking, and click Save. Or, if you don’t need the new user to offer up info, just click Remove at the bottom left of the dialog box.
When you’re finished, click Publish to make the Onboarding workflow available to your channel.
More room to customize
If Slack’s pre-built templates won’t get the job done, it’s easy to add new custom workflows to your channel, to send a message or form to one coworker or the entire channel. Since you’ve just seen how to use a Slack workflow template, you’ll recognize the steps.
For example, you could create a workflow that, when selected from Slack’s Actions menu, creates a request — like an after-hours trouble ticket that prompts the user to fill out a form then send it to a channel monitored by one or more team members who are on call.
To create a new workflow, open the Workflow Builder by clicking the name of your workspace in Slack. Click Create. Name your workflow and click Next.
Then, under Actions menu, click Edit. Select the channel where you want the workflow to appear, and add a descriptive name that users will see in the Actions menu. Click Save.
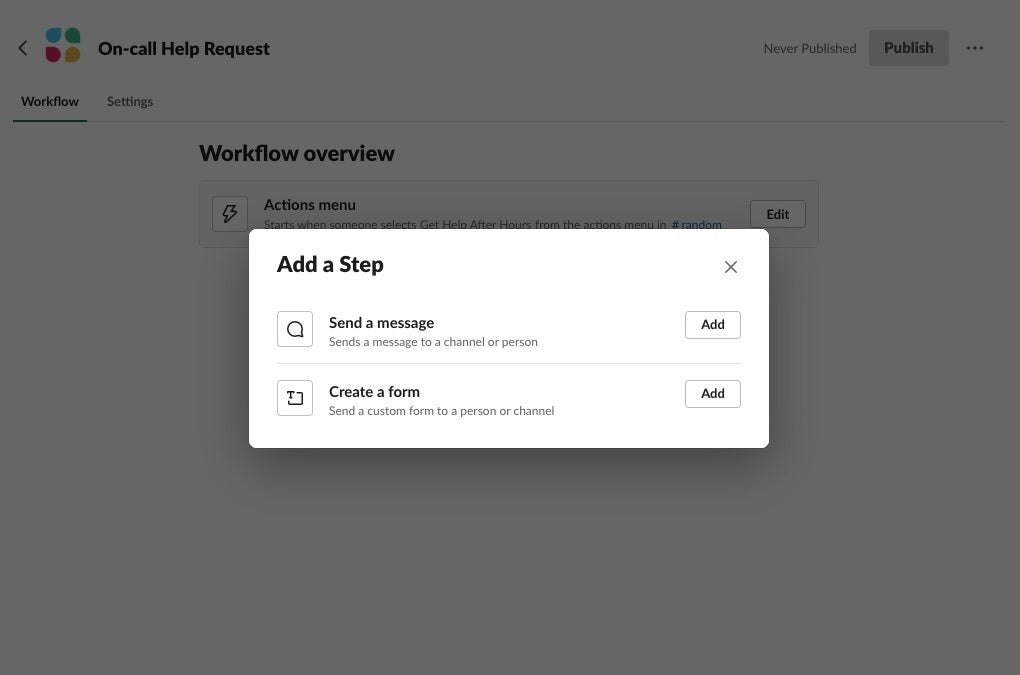
Click Add Step. Choose whether you want to send a message or form, and then click Add. To design your own help request form, for example, customize the text and click Add Question as needed. Then choose who the form should be sent to — a person or a channel. Once you’re done, click Save.
 Slack
SlackSlack workflows are useful for automating any routine busy work, where you’re asking for input and sending the results to coworkers. However, If you want to automate tasks in a third-party tool, like G Suite or Office 365, or to project management software, like Trello or Asana, you’re better off importing a Slack app. (You can see a list of them here.)
In contrast, the appeal of workflows is that you get to control how a task starts and who receives the message or form. And, now that you’ve edited Slack workflow templates, you may find creating custom workflows may save you and your team time from boring, repetitive busywork in the future.