


Five advanced SharePoint 2013 tips
Now that you have a good feel for what is possible in SharePoint 2013 and how to do common tasks, here are some tips for taking advantage of more advanced functionality and getting the most out of your SharePoint site.
Set up alerts. SharePoint can be configured to send you an email or an SMS text message whenever things are changed -- either a specific item in a library or if anything in a library as a whole. This is useful since you won't then have to go back and manually check each SharePoint site for changes. You can set up alerts using the Alert Me button in the ribbon on any given SharePoint content area.
Clicking Alert Me brings up the New Alert window, where you add a title to the alert and the delivery method -- as mentioned, either an email to a specified address or a phone number for an SMS text message. You can also specify the context of the alert (whether an alert is sent for any change, if new items are added, if existing items are modified, or if items are deleted), the scope of an alert (if anything changes, if a document changes, if a document you created or last modified changes), and how quickly the alert is sent after a change (you can set up an immediate alert, a daily summary, or a weekly summary and you can customize the time for this).
Customize your views and add columns when necessary. Sometimes you might need to track a little more information about items in a library than SharePoint comes pre-configured out of the box to track. For example, you might want to add a drop-down list that has choices about an item's status that users can select at various points during the lifecycle of that item. It's easy to add these choices to SharePoint list views.
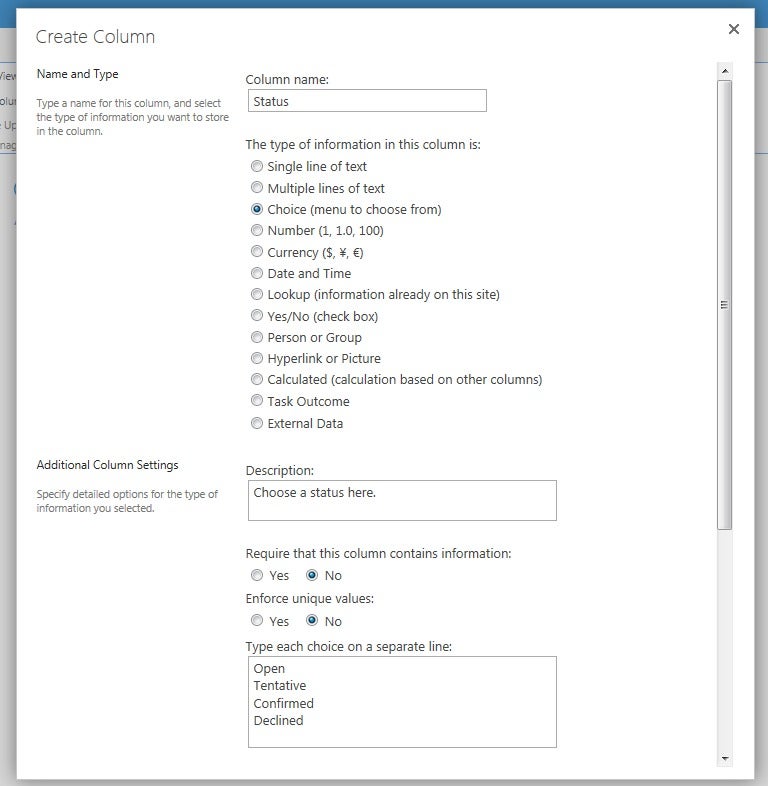
In a document library, for example, select the Library tab and then click Create Column.

Customize your views and add columns when necessary.
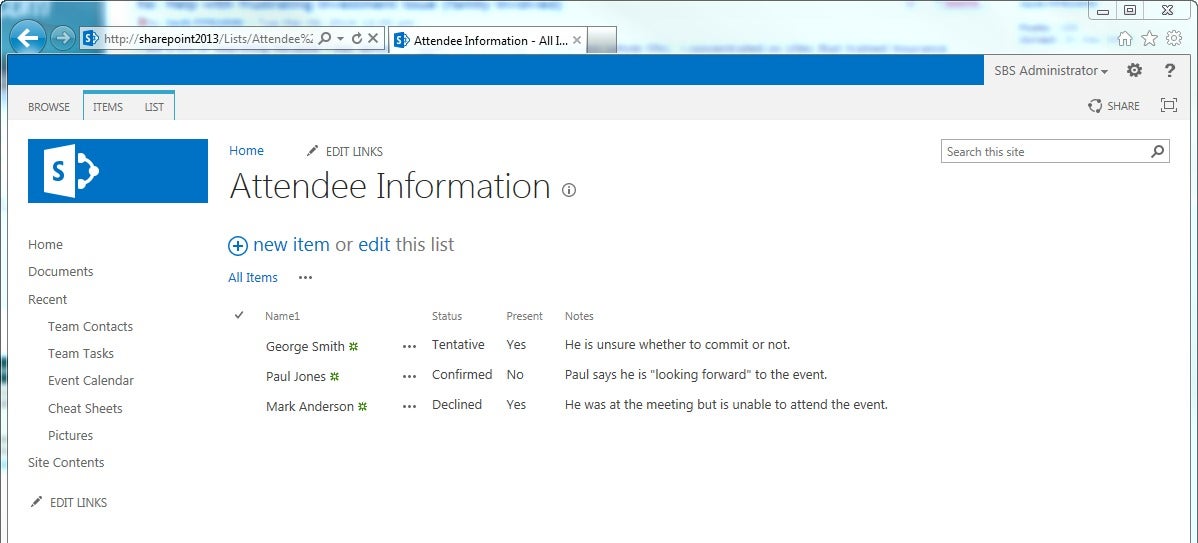
You can give the column a name, and then select the type of information this column will contain -- in this example, we’ll select Choice, which will prompt SharePoint to display a menu of choices. You can then add a friendly description of the column, make its completion mandatory and enforce whether more than one item in a library can have the same status, and then you can type each status choice on separate lines in the next box. You can then select how the choices will be displayed, allow users to write in choices, and pick a default value. Finally, you can add this new column to the default view of the site so that it becomes immediately visible to users. Now you have a consistent set of choices to track additional information.
You can give the column a name, and then select the type of information this column will contain.
When you upload a document to this library with the new column's presence enforced, after upload you get a window asking you to choose from the selections you defined when creating the column. That choice, after you confirm it by clicking OK, is then populated in SharePoint's database and displayed in the column in the default view. You can change it by editing the item's properties. If you are working on a Microsoft Office document in a library, and choose to save it back to the library, you'll also be prompted for the status within the individual Office application -- in other words, all of the ways you interact with documents will now have that new column selection required.
Use the Explorer view when doing more than simple file maintenance. If you are uploading a big group of files to SharePoint, it can be cumbersome to try to fit them all into the drag-and-drop window. Or maybe you want to copy a lot of files out of SharePoint onto, say, a thumb drive for transport. Luckily there’s a way to make your SharePoint site's document libraries appear just like any other disk in your file system.
Open a document library within your web browser, and then click the Library tab and, from the Connect & Export ribbon group, click Open with Explorer. You may get a security warning you need to acknowledge -- click OK or Yes on this, depending on how your system is configured -- and then you'll get a standard Windows Explorer or File Explorer window just like you're used to. Copy, paste, cut, and move to your heart’s content from here.
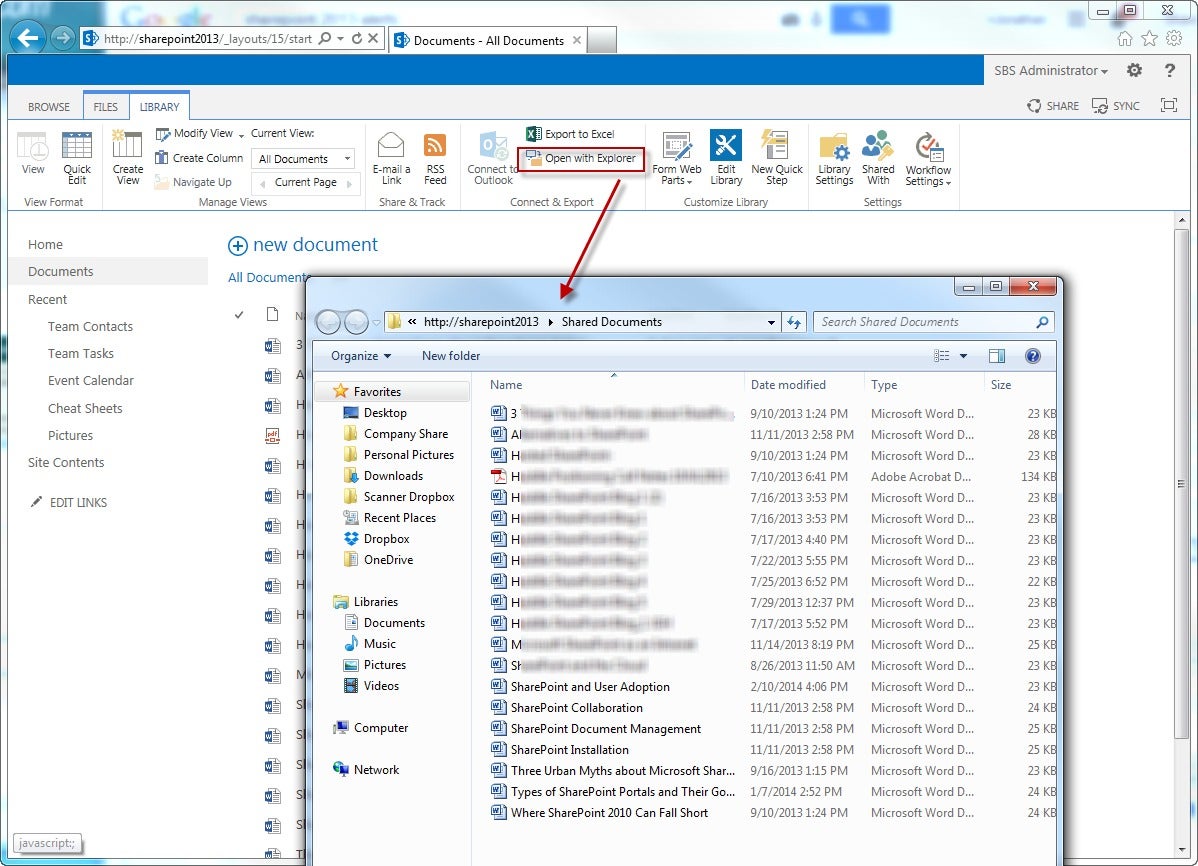
Use the Explorer view when doing more than simple file maintenance.
Do note that for this to work, you need to either be within your corporation's campus network, have DirectAccess enabled or be connected to your company VPN, or be accessing an external version of your SharePoint site. So if you're at home with no VPN and you try to access any internal URL your company may have, this Explorer view will not work. Also, some corporate administrators turn this feature off for security and information protection reasons, so check it out first before you depend on it, just to make sure it works in your organization.
Edit lists with Microsoft Excel in a familiar datasheet-style view. Chances are, you have a spreadsheet or two with a list of things -- maybe it is contact information, or a list of dates, or a summary of various projects and their statuses. No matter what it is, if you are using Microsoft Excel 2010 or later, there is a really simple way to export that data out of Excel and into a SharePoint list. There you can then edit it natively within the SharePoint web experience, either in standard view or in datasheet view.
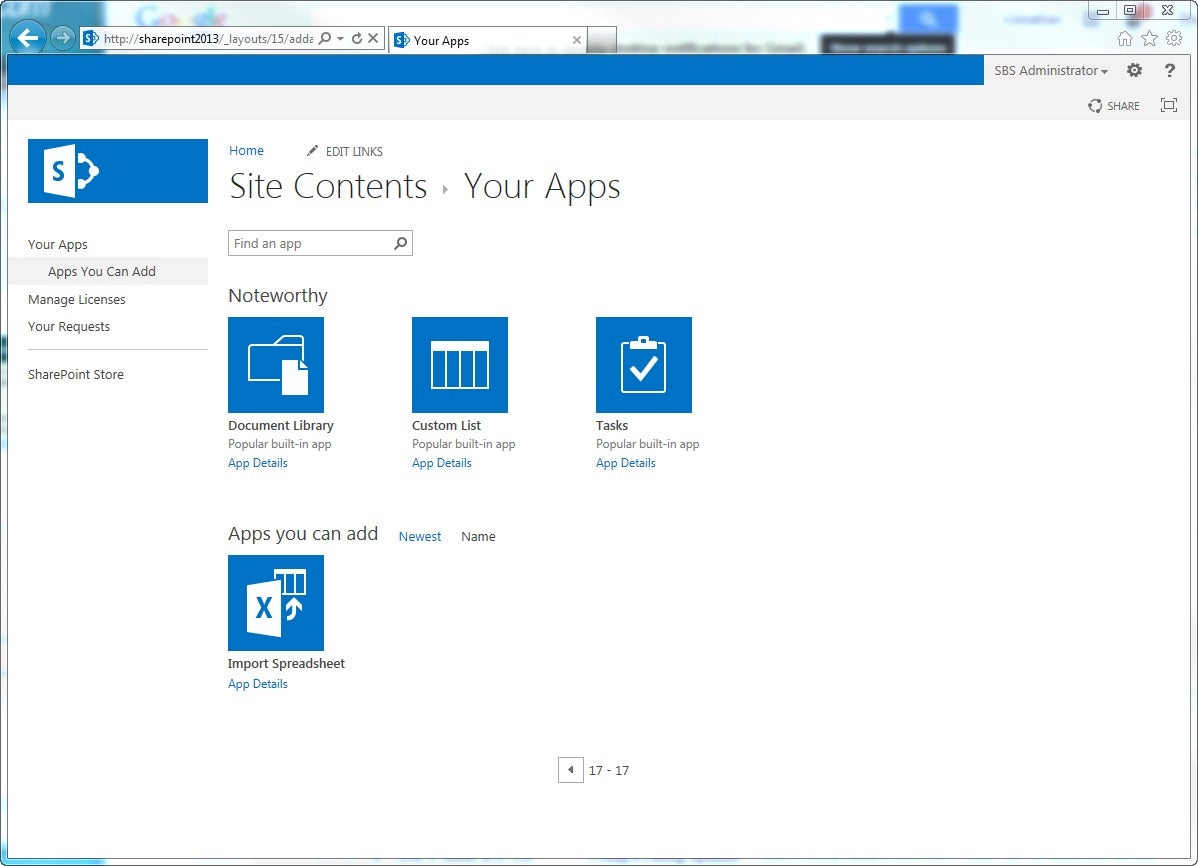
From within SharePoint, select Add an app from the Settings menu, and then from the "Apps you can add" section, click Import Spreadsheet.
Edit lists with Microsoft Excel in a familiar datasheet-style view.
Type in a new name for this list and a friendly description of this spreadsheet if you wish, and then browse to where the spreadsheet is located in your file system by clicking the Browse button and selecting the file. Once you are finished, click the Import button.

Browse to where the spreadsheet is located in your file system by clicking the Browse button and selecting the file.
In the background, Excel will open the file and the "Import to Windows SharePoint Services" list will appear. You can select the range of cells for your list, and then click the Import button in that dialog box.
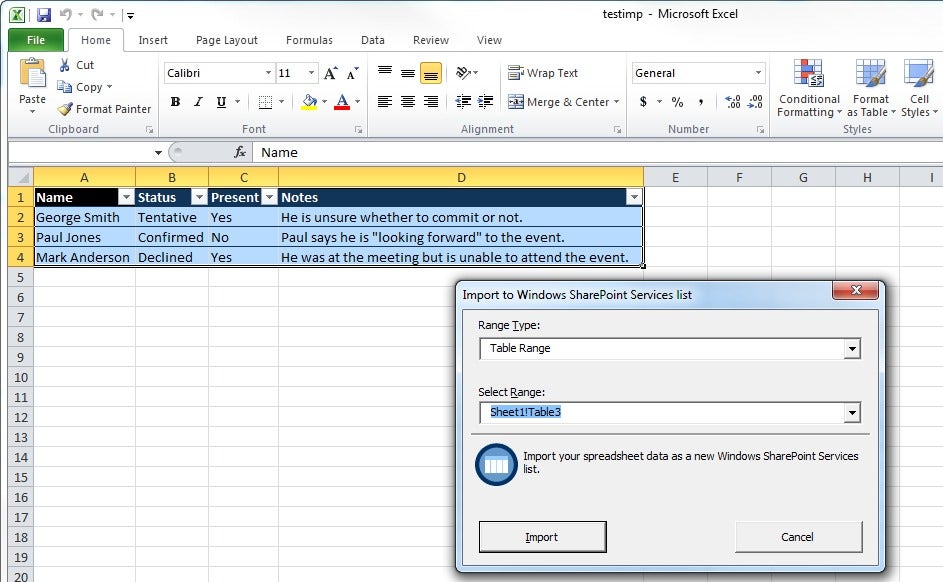
You can select the range of cells for your list, and then click the Import button in that dialog box.
You'll be returned to the SharePoint window and you'll find your list, directly imported into the SharePoint database. You can then adjust the view and change the order of the columns, their names, and more from the List tab -- just click List Settings to the far right of the window.
You’ll be returned to the SharePoint window and you’ll find your list, directly imported into the SharePoint database.
Overlay multiple calendars in SharePoint to create a master calendar. Your team can now have a "master calendar" that includes calendar rollup information from calendars that are nestled deeper into the SharePoint site hierarchy. You can overlay up to 10 calendars over one another to create this master calendar, and each calendar is displayed in a different color code (kind of like what happens when you link a SharePoint calendar to Outlook and then overlay the two calendars within the Outlook client).
At the main SharePoint site where you want the master calendar to live, either create a new calendar list from the Site Actions menu, or use an existing calendar that already is configured at the level you want. On the Calendar tab in the ribbon, click Calendars Overlay, and then click the New Calendar link to add a new calendar to the overlay view.

On the Calendar tab in the ribbon, click Calendars Overlay, and then click the New Calendar link to add a new calendar to the overlay view.
This next part is a bit trickier: You have to give SharePoint some information about the calendar that you are adding, such as a name and its friendly description, and you need to have the URL of the site that houses the calendar. This is the link to the site itself, not a link directly to the calendar. SharePoint will use that URL to crawl the site and find the calendar lists and views once you click the Resolve button after putting in the web URL.
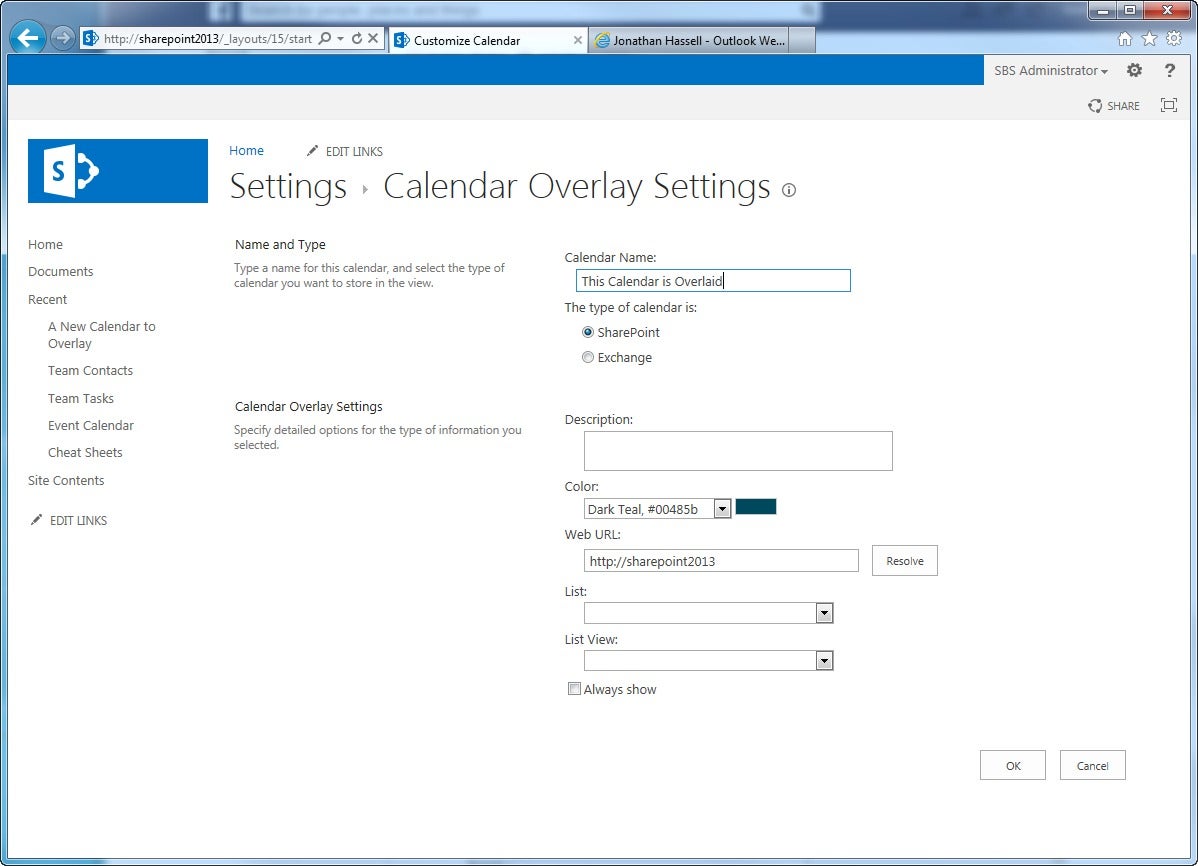
You have to give SharePoint some information about the calendar that you are adding, such as a name and its friendly description.
If the site you provided is lucky enough to have many calendar lists or views, SharePoint will ask you to choose the ones you want to overlay -- just select the box next to Always Show, and when you're done, click OK. Lather, rinse, repeat for each calendar (again, up to 10) that you want to overlay, and then click OK. Now you'll see all of those calendars rolled up into one master calendar.

Here are all of your calendars rolled up into one master version.