


More new features to take advantage of in Word 2010
While Backstage and the Navigation pane are the most important new features in Word 2010, there are several others that are well worth exploring. Here are a few of our favorites.
Paste Preview
Here's a once-simple question that has gotten more complex with time: In what format do you want to paste content into Word? Given that you may be pasting rich text, plain text, graphics, a mix of text and graphics, tables and so on, the simple paste operation has become confusing.
Word 2010's new Paste Preview feature solves the problem very simply. When you paste anything into Word, a small icon of a clipboard appears next to what you're pasting, with a downward-facing triangle next to the clipboard. If you click the triangle, you will see small thumbnails for all the paste options available to you for the specific type of content you're pasting.
Hover your mouse over any thumbnail, and not only will you see a description of the paste option (for example, Keep Text Only, Picture, and so on) off to the side, but the content that you're pasting will change to reflect that option in the main document. Click an option to paste in the content in that format.
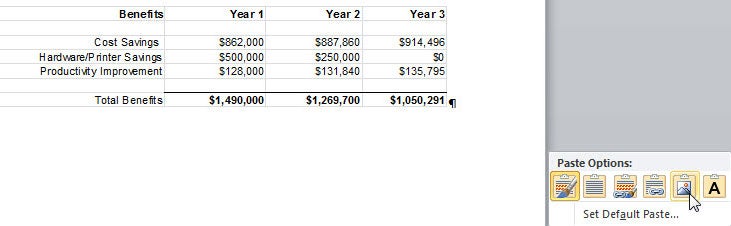
So let's say you're pasting cells from a spreadsheet, and you want to save those cells as a graphic. Paste the cells, click the clipboard thumbnail, and select the Picture thumbnail that appears.
 IDG
IDG
Paste Preview in action. (Click image to enlarge.)
What's the point of all this? In previous versions of Word, you didn't get a chance to preview the results of your paste choice. With Paste Preview, you do. Make Paste Preview your friend. It sounds like a minor change, but it will save your plenty of undo and redo operations.
By the way, you can also set a default paste option. After you click the clipboard icon, click Set Default Paste. You'll then be sent to Word's Advanced Options page, where you can select your default paste option. Alternatively, you can select File --> Options --> Advanced to get to this page.
Image editing tools
Word 2010 offers new tools for performing basic image editing on a graphic or photo you're using in a document. These tools certainly don't rival Photoshop or even midrange image-editing software, but for basic, quick-and-dirty editing, they're quite good.
 IDG
IDG
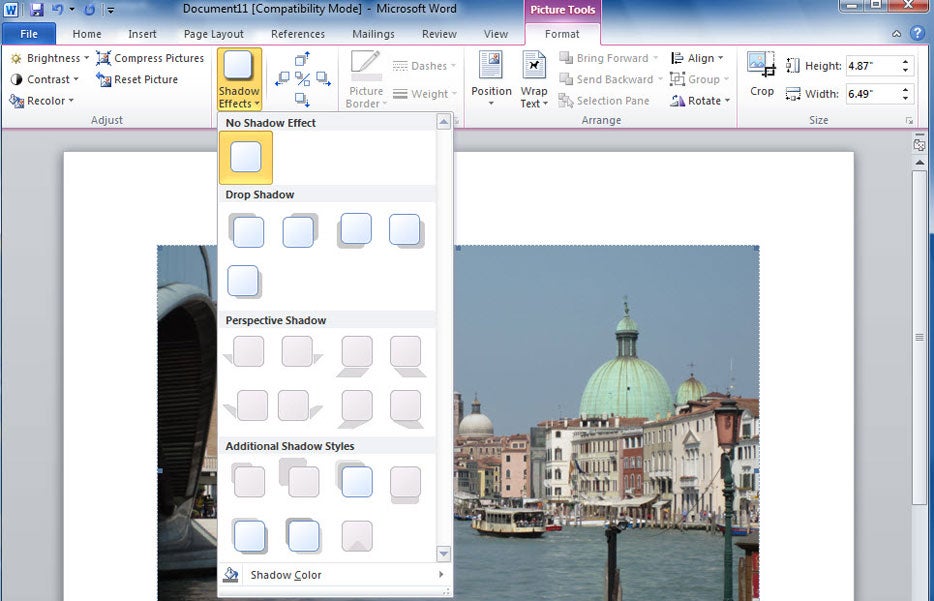
Word 2010 offers simple, useful, quick-and-dirty image-editing tools. (Click image to enlarge.)
Select an image in a document and you'll see a Picture Tools tab on the Ribbon. The tools are straightforward and self-explanatory. For changing the brightness or contrast, for example, click the appropriate button at the left end of the Ribbon and simply select your option -- anywhere from +40% to -40% for increasing or decreasing the brightness or contrast.
The Recolor button gives you options for performing tasks such as converting a color photo to gray scale or black-and-white. If you want to reduce the amount of space your document takes up on your hard disk, or shrink a picture because you're posting the document with the picture onto the Web, click Compress Pictures and make your selection.
You can also add a variety of shadows by clicking the Shadow Effects button. And pay attention to the box just to the right of the Shadow Effects button: By clicking the appropriate arrow you can move the shadow down, up or to either side.
The remainder of the image-editing tools, on the right side of the Ribbon, let you crop and reposition graphics, wrap text around them and so on. Again, it's all straightforward and self-explanatory, especially if you've used graphics-editing tools before.
Text effects
Do you like fancy-looking text with plenty of special effects? Then you'll be pleased with Word 2010's Text Effects feature. It lets you add all kinds of special effects to any text on the page -- make the text outlined, make it look as if it glows, apply a gradient, apply one color to the outline and another to the fill, add shadows and so on. (Note that this feature is available only when you create or edit .docx files; it doesn't work for files in the older .doc format.)
This may sound suspiciously like what was called WordArt in previous versions of Word. It's not, though -- it's more powerful than that. When you add text effects, the text remains as text, rather than being turned into a graphic. So you can still edit the text and do anything to it that you can do to plain-Jane text.

It's easy to pretty up text using the Text Effects feature. (Click image to enlarge.)
Adding text effects is exceptionally easy. Highlight the text to which you want to add effects and then, using the Home tab, find the Font section and click the Text Effects icon -- it's an outlined letter A. When you click it, you'll get a gallery of various text effects you can apply.
You're not stuck with what's shown there, though. Beneath the handful of styles shown in the gallery, you'll find options for creating your own effects by applying a variety of outlines, shadows, reflections and glows.
Protected view
Word 2010 introduces a new feature called Protected View, which is designed to keep you safe when opening Word documents sent to you via email or that you downloaded from the Web. Any time you open one of those documents, it's opened in Protected View, which essentially means that you're blocking that document from accessing your computer.
It also means, though, that you can't edit those documents, or even print them -- you can only read them. When you open a document in Protected View, you'll see a notification at the top of the page. If you want to edit or print the document, click the Enable Editing button.
 IDG
IDG
Protected View blocks downloaded or emailed content from accessing your PC. (Click image to enlarge.)
If Protected View annoys you, click File --> Options --> Trust Center --> Trust Center Settings. From there you can turn off Protected View altogether or customize it to a limited extent -- for example, you could turn it off for documents you receive in Outlook but leave it on for documents you download from the Web.
Other small changes from Word 2007
Microsoft introduced a number of useful features in Word 2007 -- including the Mini Toolbar, Themes, Live Preview and more -- that users of earlier Word versions will likely want to learn about. These are still available in Word 2010, and for the most part they work just as they did in Word 2007, with a few exceptions, such as these:
Saving in the .doc file format: Like Word 2007, Word 2010 defaults to saving files in the .docx format. To save documents in the older .doc format for compatibility with users of Word 2003 or earlier, click the File tab; then, in Backstage, choose Save As --> Word 97-2003 Document. To have Word 2010 save all of your files in the old .doc format automatically, click the File tab and choose Options --> Save --> Save files in this format --> Word 97-2003 Document. (Reminder: Doing this will limit your options for things like text effects and other features available only in the .docx format.)
Quick Parts: To insert a style or an object such as a decorative text callout into your document, click the Insert tab, click Quick Parts --> Building Blocks Organizer, select what you want from the list that appears and click Insert. To insert a field such as the page number, click the Insert tab, click Quick Parts --> Field, choose the field you want to insert and click OK.
Blogging: To save a document as a blog post, click the File tab and choose Save & Send --> Publish as Blog Post.
Five tips for working with Word 2010
With the introduction of the Ribbon in 2007, many familiar ways of interacting with Word became hard to find while powerful new tools cropped up. These five tips, originally written for Word 2007 and now updated for Word 2010, can help you get the most out of the new interfaces and locate your old favorites.
1. Add commands to the Quick Access toolbar
By letting you customize the Ribbon, Word 2010 has gotten a lot more flexible than Word 2007. But it can still be helpful to customize the Quick Access toolbar for one-click access to your most frequently used commands no matter which Ribbon tab is showing.
As mentioned earlier in the story, you can do this via Backstage's Options screen, but a quicker way is to click the small down arrow to the right of the Quick Access toolbar and choose More Commands.
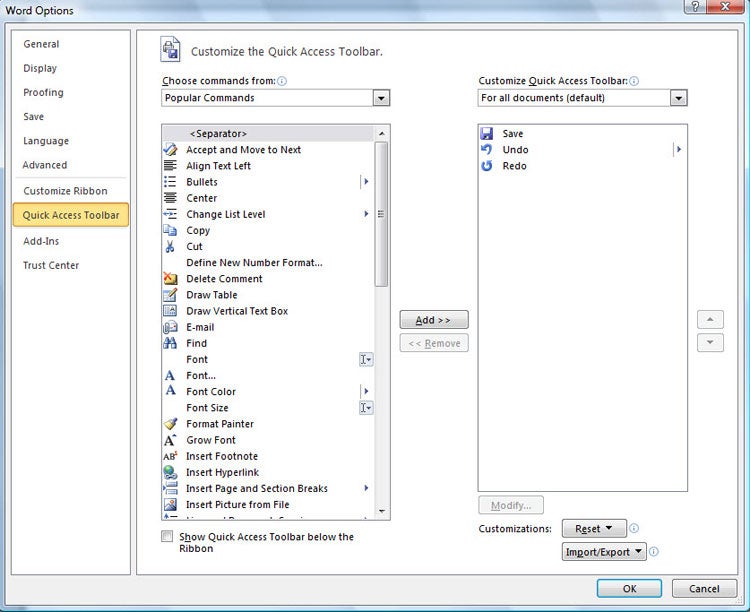
From the left-hand side of the screen that appears, choose a command that you want to add to the toolbar and click Add. You can change the order of the buttons by highlighting a button on the right side of the screen and using the up and down arrows to move it.
 IDG
IDG
Adding buttons to the Quick Access toolbar. (Click image to enlarge.)
The list of commands you see on the left may seem somewhat limited at first. That's because Word is showing you only the most popular commands. Click the drop-down menu under "Choose commands from" at the top of the screen, and you'll see other lists of commands -- All Commands, Home Tab and so on. Select any option, and there will be plenty of commands you can add.
Finally, there's an even easier way to add a command. Right-click any object on the Ribbon and choose "Add to Quick Access Toolbar." You can add not only individual commands in this way, but also entire groups -- for example, the Font group.
2. Hide the Ribbon
Here's what may be the best tip you'll ever come across for Word 2010 -- how to turn off the Ribbon. Doing this will get you back plenty of screen real estate, as you can see in the screenshot below.
 IDG
IDG
It's easy to make the Ribbon disappear and reappear.
To hide the Ribbon, you can either press Ctrl-F1 (and press Ctrl-F1 again to make the Ribbon reappear) or just right-click anywhere in the Ribbon and select "Minimize the Ribbon."
The Ribbon will still be available when you want it -- all you need to do is click on the appropriate tab (Home, Insert, Page Layout, etc.) and it appears. It then discreetly goes away when you are no longer using it.
3. Use macros
As in Word 2007, macros -- ingenious shortcuts you can create for performing repetitive tasks -- are hard to find in Word 2010. But they're there: If you display the Developer tab, you'll find the macro tools in all their glory in the Code group. In fact, they're easier to reach than they were in earlier versions of Word.
 IDG
IDG
All your macro controls are in the Code group on the Developer tab.
You'll find everything you want in the Code group. Record a macro by clicking the Record Macro button, manage your macros by clicking the Macros button, and configure security for a macro by clicking the Macro Security button.
4. Find your old friends
If you've been using Word 2007, you've probably found most of the features and functions you used in earlier versions of Word. But if you're upgrading directly to Word 2010 from Word 2003 or earlier, you'll have a hard time locating many of your favorite commands.
Use our for an extensive list of where to find your old friends in the newest version of Word. We've also included keyboard shortcuts for all these commands to save you more time.
5. Use keyboard shortcuts
If you've been using keyboard shortcuts in Word 2007, Word 2003 or earlier versions, take heart -- the same ones work in Word 2010. So keep using them.
You can also use a clever set of keyboard shortcuts for working with the Ribbon. (These are unchanged from Word 2007.) Press the Alt key and a tiny letter or number icon appears on the menu for each tab -- for example, the letter H for the Home tab. Now press that letter on your keyboard, and you'll display that tab or menu item. When the tab appears, there will be letters and numbers for most options on the tab as well.
 IDG
IDG
Using the Alt key helps you master the Ribbon.
Once you've started to learn these shortcuts, you'll naturally begin using key combinations. So instead of pressing Alt then H to display the home tab, you can press Alt-H together.
The screenshot above shows the most useful Alt key combinations in Word 2010. For more nifty keyboard shortcuts, see the table below. And even more shortcuts are listed on Microsoft's Office 2010 site.
Next:
More useful keyboard shortcuts in Word 2010
| Key combination | Action |
|---|---|
| Document navigation | |
| Ctrl-Up arrow | Move up one paragraph |
| Ctrl-Down arrow | Move down one paragraph |
| Ctrl-Right arrow | Move right one word |
| Ctrl-Left arrow | Move left one word |
| Ctrl-Home | Move to the top of the document |
| Ctrl-End | Move to the bottom of the document |
| Ctrl-G or F5 | Go to a page, bookmark, footnote, table, comment or some other location |
| Alt-Ctrl-Z | Switch among the last four places in the document you edited |
| Alt-Ctrl-Home | Open options for browsing through document |
| Text formatting | |
| Ctrl-B | Make text bold |
| Ctrl-I | Make text italic |
| Ctrl-U | Underline text |
| Ctrl-Shift-D | Double underline text |
| Ctrl-Shift-W | Underline a word |
| Ctrl-Shift-A | Make text all caps |
| Ctrl-Shift-K | Make text small caps |
| Ctrl-Shift-+ | Make text superscript |
| Ctrl-= | Make text subscript |
| Ctrl-Shift-> | Make font size larger |
| Ctrl-Shift-< | Make font size smaller |
| Ctrl-D or Ctrl-Shift-F | Open the font dialog box |
| Shift-F3 | Change the case of letters from upper to lower or lower to upper |
| Paragraph formatting | |
| Ctrl-L | Left-align text |
| Ctrl-R | Right-align text |
| Ctrl-E | Center-align text |
| Ctrl-J | Justify text |
| Ctrl-M | Indent a paragraph |
| Ctrl-Shift-M | Remove paragraph indentation |
| Ctrl-1 | Change to single-line spacing |
| Ctrl-2 | Change to double-line spacing |
| Ctrl-5 | Change to 1.5-line spacing |
| Ctrl-Shift-S | Open the Apply Styles task pane |
| Ctrl-Q | Remove paragraph formatting |
| Other useful shortcuts | |
| Ctrl-N | Create a new document |
| Ctrl-O | Open a document |
| Shift-F5 | When you open a document, go to the place you were working when you last closed it |
| Ctrl-S | Save a document |
| Ctrl-W | Close a document |
| Ctrl-F | Open the Navigation pane |
| Ctrl-H | Open the Search and Replace dialog box |
| Ctrl-P | Print a document |
| Alt-Ctrl-P | Switch to Print Layout View |
| Alt-Ctrl-O | Switch to Outline View |
| Alt-Ctrl-N | Switch to Draft View |
| Alt-Ctrl-I | Switch to Print Preview |
| Alt-Ctrl-M | Insert a comment |
| Ctrl-Shift-E | Turn revision tracking on or off |
| Alt-Shift-C | Close the Reviewing Pane |
| Ctrl-C | Copy selection to the clipboard |
| Ctrl-V | Paste from the clipboard |
| Ctrl-X | Delete selection and copy it to the clipboard |
| Ctrl-Z | Undo the last action |
| Ctrl-Y | Redo the last action |
Preston Gralla is a contributing editor for Computerworld.com and the author of more than 35 books, including How the Internet Works (Que, 2006).