


The buzz today may be all about Office 2016 for Windows, which is due to be released this fall, but many business users are still getting acquainted with Office 2013 and will continue to use it for some time. Use this Word 2013 cheat sheet to help take advantage of all it has to offer.
Your copy of Word 2013 may have been purchased as standalone software or as part of an Office 365 subscription. For the purposes of this story, that doesn't matter; all tips herein apply to whatever version of Word 2013 you're using.
Note that this cheat sheet focuses on what's new in Word 2013, rather than what has stayed the same from previous versions. If you're looking for help getting up to speed on the basics, such as how to work with the Ribbon interface, check out our Word 2010 cheat sheet.
Get around Word 2013
The most obvious change in Word 2013 is its overall look. Even though Word is a traditional desktop app, Word 2013's style follows the basic guidelines that Microsoft has set for its so-called Windows apps (formerly called Metro or Modern apps) that debuted with Windows 8. The Ribbon is now flat instead of three-dimensional, as are all dialog boxes and screens.
 IDG
IDG Word 2013 has a flatter look than previous versions of Word. (Click image to enlarge.)
Beyond the basic look, though, the Ribbon behaves as it did in Word 2010, with a couple of enhancements that we'll get to later.
A touch-friendly interface
 IDG
IDG
Word 2013 can be optimized for either the mouse or touch.
If you're using a touch-based device, you can change Word's interface slightly to make it easier to use. On your touch-based device, click or tap the small icon of a hand with an upright index finger that's on the top left of the screen and you'll be able to choose between a mouse-based or touch-based interface.
The mouse-based interface is the default. In the touch-based interface, the icons on the Ribbon are enlarged and there is more space between them, making it easier to tap the one you want without accidentally tapping another.
 IDG
IDG
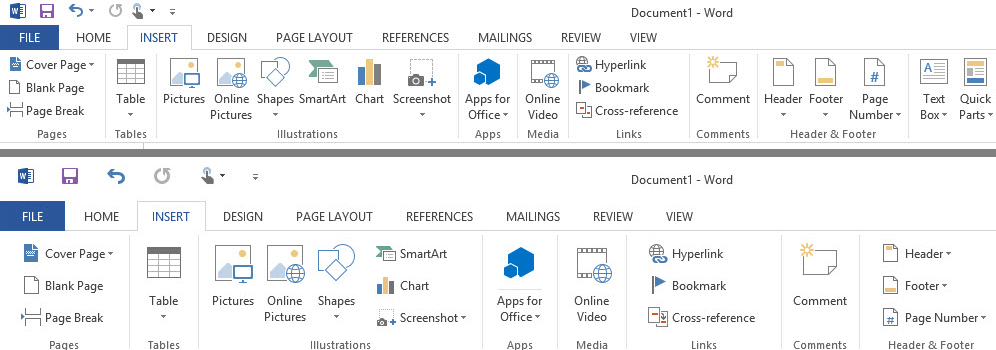
On top is what the Ribbon looks like using the traditional mouse-based interface. On the bottom is the Ribbon in the touch-based interface -- notice the larger icons and more space between them. (Click image to enlarge.)
The Start screen
Like Windows 8 and 8.1, Word 2013 shows a Start screen when you launch it. It's simple and straightforward to use. The left-hand side of the screen is given over to a list of the most recent documents you've worked on. Click any to open them. To open a different document, click "Open Other Documents" down at the bottom left of the screen.
 IDG
IDG
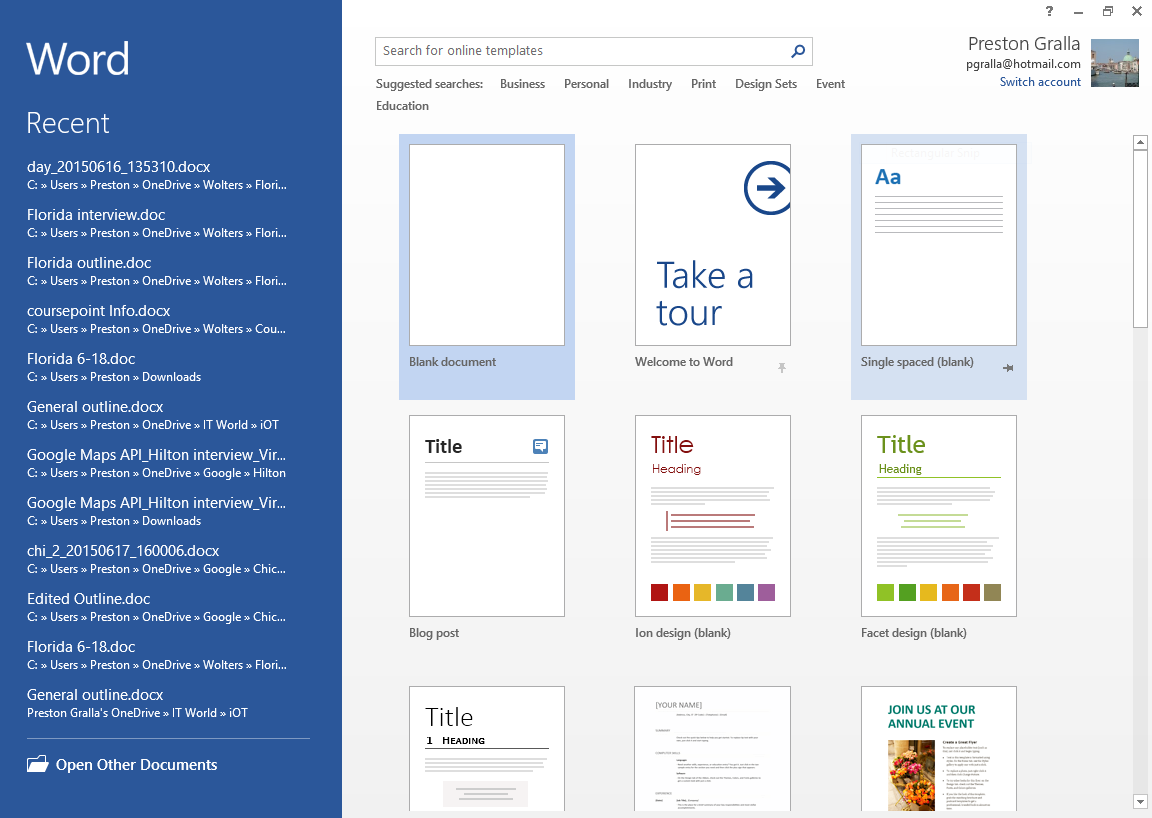
Word 2013's new Start screen lists documents you've recently opened, and shows thumbnails of templates you might want to use when creating a new document. (Click image to enlarge.)
The main part of the screen, on the right, is taken up by more than two dozen templates for creating new documents -- everything from simple, straightforward, single-spaced basic documents to flyers, party invitations, brochures and business cards. Click any and you'll come to a screen with a basic description of the template, along with its average user rating. Click Create to use the template.
 IDG
IDG
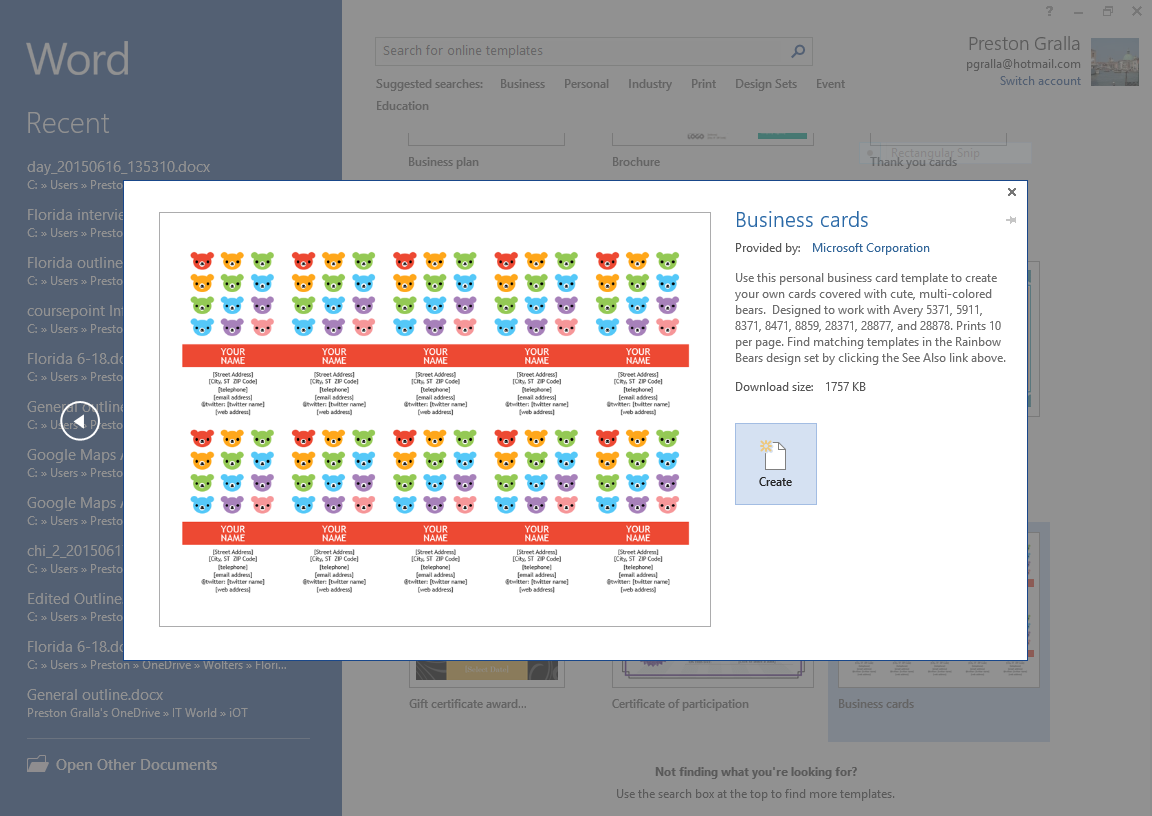
Click a template's thumbnail to see more information about it. (Click image to enlarge.)
Not happy with the templates you see? Microsoft has a sizable template repository with plenty more. Up at the top of the screen, type in what you're looking for -- for example, "letters," "resume" and so on. You'll come to a list of templates that match your search. Click one and you'll see the same kind of screen that you do when you use a template from the Start screen. As with those templates, click Create to use it.
Note that the templates -- both those listed on the Start screen and those you search for -- aren't on your local machine. They're on a Microsoft template repository. So when you choose one, you'll first download the template before you use it. The download size is listed on the template's description screen.
Incidentally, if you hate the Start screen, you can easily get rid of it. Just choose File --> Options, and in the "Start up options" section of the default General screen, uncheck the box marked "Show the start screen when this application starts."
The Design tab
The Ribbon has largely stayed the same from earlier versions of Word, but there's a very nice new addition to the right of the Insert tab: the Design tab. This tab gives you, in one location, access to the most important ways you can change a document's design.
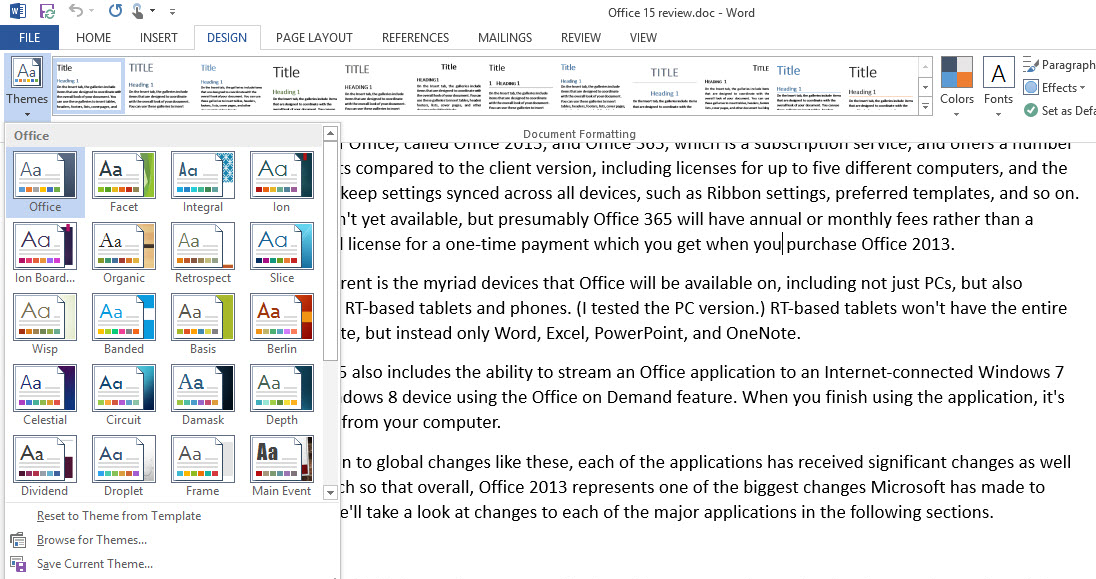
You can choose from a variety of pre-designed templates with different title and heading sizes, paragraph formatting and so on. There's also a new set of themes you can apply to your document that include different font styles, sizes and colors. From the Design tab you can also customize colors and fonts, adjust paragraph spacing, add watermarks, change the page color and page borders, and more.
Each theme and template has a thumbnail, so you have a good sense what you'll be getting before you make your choice. When you click a thumbnail, the changes are immediately applied to your document. In this way it's simple to click through many of them until you find the one you want.
 IDG
IDG
Word 2013's new Design tab lets you easily set the styles for your document. (Click image to enlarge.)
Note that if you're working on a .doc file rather than a .docx file, you won't be able to select themes. It's simple to convert a .doc file to a .docx one, though. Just select File --> Convert.
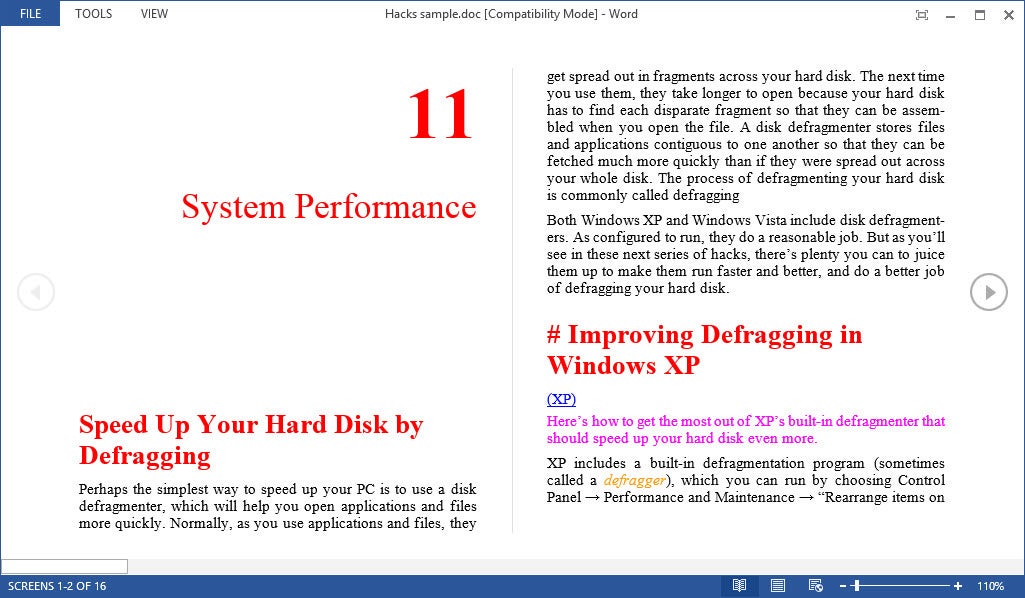
Use Read Mode
You use Word not just to create documents, but to read them as well. And to make that more pleasurable both on traditional computers and tablets, Word 2013 introduces Read Mode, which displays documents and eliminates distractions, including most of the Ribbon. In Read Mode, you've got a largely clutter-free screen -- although as you'll see, there are a few tools that have been put within easy reach. You can't edit documents in Read Mode; as the name implies, you can only read.
To put Word into Read Mode, select View --> Read Mode. The Ribbon vanishes and your document is put into a two-column view. Arrows appear on each side of your screen. Click or tap them to move through the document in either direction. If you've got a touchscreen, you can also swipe in either direction.
 IDG
IDG
In Word 2013's Read Mode, you can focus on reading your documents, with distractions such as the Ribbon put away. (Click image to enlarge.)
Upper-left menu
Not all menus and controls vanish with Read Mode, however. On the upper-left of the screen, there's the File menu, the Tools menu and the View menu. Select File to go to Word's usual File menu. Tools lets you search within the document or do a Bing search. To search using Bing, highlight a word or phrase and select Tools --> Search with Bing; you'll launch Bing in your browser with search results for the phrase. The Tools menu also lets you undo changes you've made in a document.
The View menu gives you several options, including putting the document back into normal Edit Mode, changing the layout of the screen (you can switch between two columns and one column), changing the column width and page color, displaying comments if someone has commented on the document, and turning on (and then off) Word's navigation pane.
Upper-right menu
On the upper-right of the screen are the usual icons for minimizing and maximizing windows, as well as for closing Word. But there's a new one as well, the leftmost one, which looks like a rectangle with a bracket at each corner. Click it and the File, Tools and View menus disappear, and so does Word's usual toolbar across the bottom of the screen, which controls making text larger and smaller, changing the layout view and so on.
In essence, it's Read Mode on steroids -- no controls and menus at all. To get the menus and controls back, click the three dotted lines that appear when you put Read Mode into this look-Mom-no-menus mode.
Zoom Mode
Read Mode includes a handy zoom feature. Right-click a table, chart or graphic, and you can zoom in on it -- even all the way so that it fills the entire screen. I've found it quite useful for examining detailed information in a table.
Sync with OneDrive
In Office 2013, Microsoft finally got around to integrating the Office applications to its SkyDrive cloud-based storage service, which it has since renamed OneDrive. No longer will you have to fiddle to get them working together properly. Right on installation, everything works.
In case you're not already a OneDrive user, here's a bit of background: It's a cloud-based storage service that automatically syncs files between your local devices and the cloud. Locally, files are saved in the C:\Users\<Your Name>\OneDrive folder, where <Your Name> is your account name. (Note that if you installed SkyDrive before it was renamed to OneDrive, there's a possibility that it still might be called SkyDrive in your folder structure.)
You work on a file locally, save it locally and from there it syncs to your cloud-based OneDrive account. That cloud-based account then syncs the files to any other devices on which you have OneDrive installed. So when you save a file to your local OneDrive folder, it ends up syncing to them all.
You can also open files directly from OneDrive, even on computers that don't have OneDrive installed, by going to OneDrive on the Web. When you make changes to documents this way, it also syncs to any devices on which OneDrive is installed.
Using OneDrive with Word 2013 is straightforward. The local \OneDrive folder is like any other folder on your PC, except that it syncs to the cloud, of course. So you can create folders, subfolders and so on underneath it, and those will get saved locally and to OneDrive in the cloud as well. Open files as you would any other, by heading to the folder. You can also click the File tab, click Open, highlight "<Your Name> OneDrive," then click the Browse button and browse to your file from there.
 IDG
IDG
Saving files to your OneDrive folder syncs them to the cloud. (Click image to enlarge.)
That's not to say that you won't get confused by OneDrive, because you well might. One issue is that, depending on your version of Windows, you might have an existing folder structure that often defaults to something likeC:\Users\<Your Name>\Libraries\Documents\My Documents or C:\Users\<Your Name>\Documents\ or something similar. That means you may end up storing some files in your OneDrive folders and others in your normal Documents or My Documents folders, which can be immensely confusing. Only the files in the OneDrive folders will sync.
What to do? You can simply copy over all your existing files and folders to the OneDrive folder, and at that point, you'll have only one folder structure and everything will sync.
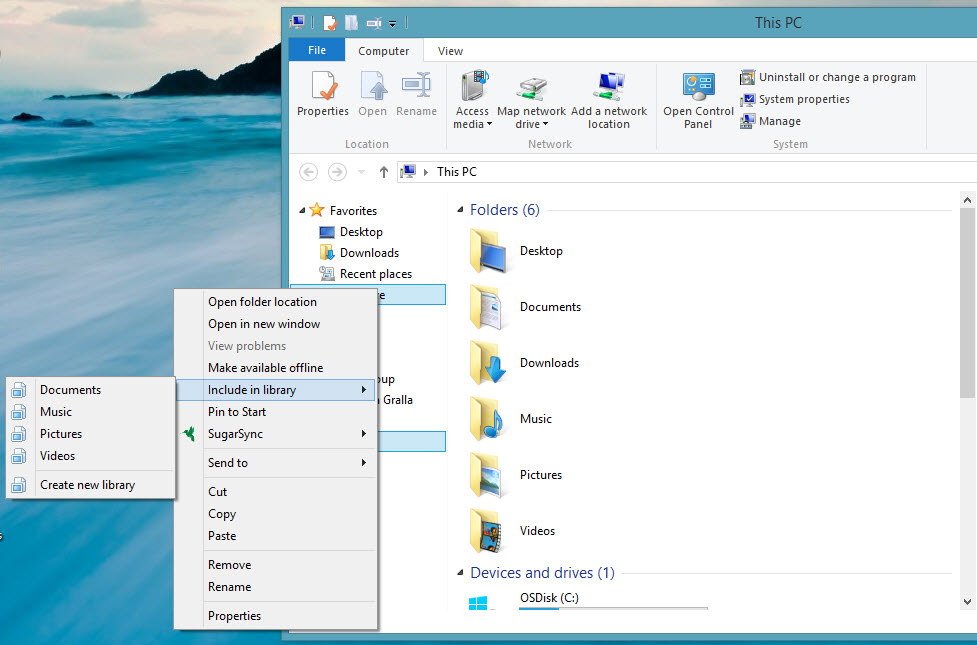
There's another solution as well. Open File Explorer (called Windows Explorer in versions of Windows prior to Windows 8). Right-click the OneDrive folder and select "Include in library" and then choose the library in which you want your OneDrive to appear -- for example, Documents. You can also choose to create a new library, and have it appear in that new library.
 IDG
IDG
Integrating OneDrive with your Documents folder. (Click image to enlarge.)
From now on, when you open that library, OneDrive will appear underneath it. Note that OneDrive and its files actually stay in its original location, and it continues to sync as always. In essence, by telling OneDrive to show up in Documents, you've created a shortcut to it there.
Use markup and comment enhancements
Those who use Word's markup tools for working with others will be quite pleased at some extremely useful changes to the way that you can collaborate with others on a document using Word's markup features.
Here's where you can lock a document into Track Changes mode.
I particularly welcome a feature that lets you lock Track Changes mode, so that once you've put a document in that mode it can't be taken out of it unless someone has a password that you've created. Using it is simple: On the Review tab, after you've selected Track Changes --> Track Changes to put the document in tracking mode, select Track Changes --> Lock Tracking and type a password in the box that appears. From that point on, only someone with that password can turn off Track Changes.
There are other useful changes to commenting and tracking as well, aimed at simplifying the commenting and editing process. One of the more confusing things about comments in previous versions of Word is that it can be extremely confusing to follow a series of related comments, because there's no single thread to follow. Rather than seeing a history of the comments, laid out neatly, you see individual comments that don't necessarily seem to be related to one another.
 IDG
IDG
Threading in comments makes conversations easier to follow (even when the commenter is talking to himself).
In Word 2013, you can reply to a comment directly inside the original comment itself. That way, it's easy to see the thread of comments, making the conversation much easier to follow. In addition, you can mark comments as Done. The comments will still exist, so you can revisit them if you want, but they'll be grayed out, so that you know they no longer require attention. To make comments to comments, and to mark them as done, right-click a comment and make your selection.
Finally, there's a new view when doing revisions called Simple Markup. When you turn on Simple Markup, you'll see a vertical line in the margin where any revisions were made, but you won't see the revision markup. That makes it easy to read a revised document -- you know where edits have happened without having to see all the markups. To see the edits, click the line.