


Insert online videos and graphics
Word 2013 makes it much easier to insert videos, pictures and graphics from the Internet into documents than it used to be. Rather than having to find these materials in your browser, download them to your PC and then head to Word to insert them, you can do all that in Word, downloading them straight into your document.
To do it, first go to the Insert tab. Then choose either Online Pictures or Online Video, depending on which you want to insert. If you choose to insert pictures, you'll come to a screen that lets you search the Office.com clip art collection, use Bing image search or browse your OneDrive.
You can also insert pictures from Facebook and Flickr, as long as you first connect your Office account to them. To connect to either, click the icon for the service at the bottom of the Insert Pictures screen and follow the instructions. Once you've done that, you'll be able to browse them and insert graphics from them into your documents.
No matter which way you get to the graphics, when you find one you want to insert, click it and select Insert, and the graphic is downloaded directly into your document. Once there, you can edit it just as you would any other graphic, including using alignment guides.
Similarly, when you choose to insert a video, you have a choice of searching Bing Video for a video, or searching YouTube and inserting from there. If you know the exact code for embedding a video (many video sites will let you copy this code), you can use that as well.
Unlike with graphics, you won't actually download the entire video itself. Instead, the opening screen of the video appears with a set of controls. Click the arrow to play the video and it plays from directly within Word, streaming from the Internet.
Watch how to insert pictures and videos and edit them with Word 2013's built-in tools.
Manage accounts
Head over to the File tab, and you'll notice a new menu item down on the left: Account. This menu lets you manage your Office subscription and account, your Windows 8 account, your OneDrive account and connections to other services, such as Facebook and Twitter.
What you can change on this screen can vary depending on how deeply your life is ingrained into the Microsoft ecosystem. If you have Windows 8 and use a Microsoft account, the User Information over on the left lets you change your Microsoft account picture and "About me" information, and lets you switch to another account.
Underneath that, you can select global settings not just for Word, but for all of Office, including a background and theme. And then underneath that, you can change any services that you've connected to your Microsoft account, such as Facebook, Twitter, LinkedIn and OneDrive. Only services you've linked to your Microsoft account will show up here.
When you click the Manage button next to one of the accounts, such as Twitter, you'll get sent to the Web in your browser, where you can see and manage what kind of information is being shared between your Microsoft account and that account. The options you see will depend on the service. For Twitter, for example, you can remove the connection between your Microsoft and Twitter accounts; configure whether to see Twitter contacts and their tweets from Windows 8, Windows Phone and Outlook.com; and share photos and documents from Office, OneDrive, Windows 8 and Windows Phone with your Twitter contacts.
If you have an Office subscription, on the right side on the Account screen you'll be able to see information about your version of Office and manage it. You'll be sent to the Web to see all the machines on which you've installed Office, how many installs you have left, and so on. You can also deactivate installations from there as well.
 IDG
IDG
The new Account menu on the File tab lets you manage your Office subscription and account, your OneDrive account, and connections to other services, such as Facebook and Twitter. (Click image to enlarge.)
More Word 2013 features to know about
There are other changes you'll find in Word 2013. Here are the most important ones.
Alignment guides
If you use Word to create documents with pictures in them, you'll welcome Word 2013's alignment guides. They help you precisely align photos, graphics, shapes and charts with the text in your document. They appear when you need them -- place the object where you want it to be, click the object and then click the small icon to its right.
When you do that, a menu appears that lets you choose various layouts for how you want the object to work with the text -- for example, you can have the text wrap around it, have the text appear above and below it, or even have the text appear in front of it. To change the alignment again after you've changed it already, simply click the object again and use the alignment guides to choose the alignment you want.
 IDG
IDG
New to Word 2013 are alignment guides, which make it easier to place photos, graphics and charts precisely where you want them. (Click image to enlarge.)
Work with PDFs
PDFs and Word have long been at odds -- in previous versions of Word you couldn't read or edit a PDF document. In Word 2013, that's changed. You can now choose File --> Open and select a PDF to open it.
When you open a PDF, Word 2013 converts it to a Word .docx document. It does its best to preserve formatting, graphics and so on. It generally does a good job, although I've found that graphics-heavy documents sometimes have problems. I've also found that sometimes Word puts odd line breaks in the middle of sentences. So if you do open a PDF to edit, check it carefully.
You can edit the file as you would any other .docx file, including using comments and tracking changes. You can then save it in any of the usual Word 2013 formats, including as a PDF.
 IDG
IDG
Using this menu, you can easily change how the Ribbon behaves.
Easier Ribbon control
How much of the Ribbon do you want to see as you work? Would you like it to go away? Do you want to see the tabs only? Or do you prefer the whole nine yards -- tabs with commands underneath them?
Word 2013 makes it easy to pick one. On the upper-right portion of the screen, click the icon of a rectangular window with an up arrow on it, and a menu drops down that lets you choose among those three views.
Automatic bookmarks to aid your memory
One new feature in Word 2013 can end up saving you a considerable amount of time. When you stop writing, editing or reading a document, a bookmark is placed in the last place you scrolled. Then, the next time you open the document, you'll be asked if you want to go to where you left off. If you've synced the document to OneDrive, when you next open the document from OneDrive or another device, you can go to that same bookmarked spot.
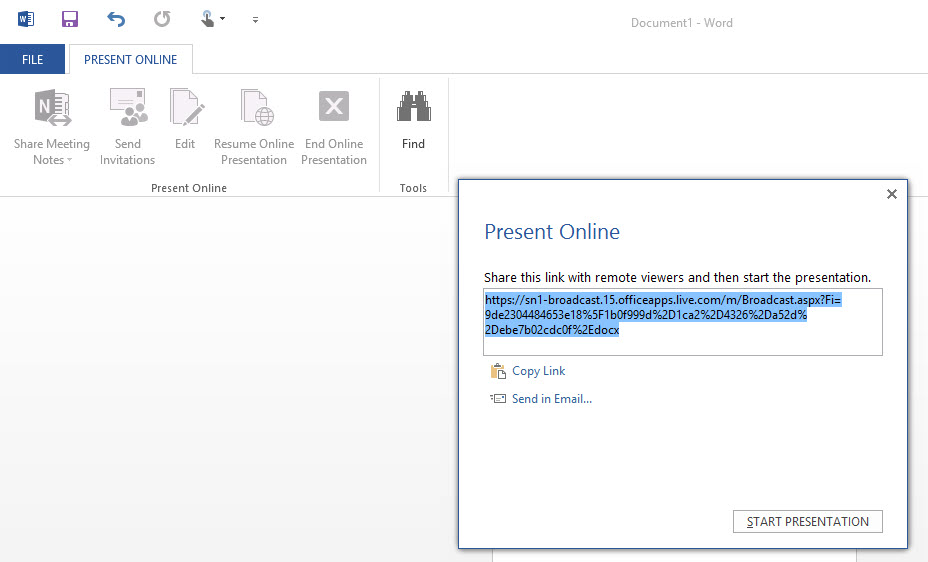
Online presentation
Word 2013 gets a sharing tool that was introduced in PowerPoint 2010 but wasn't available in Word 2010. You can now share a Word document online with anyone who has Internet access, even if they don't use Word. Send a link and start the presentation, and they'll be able to see your document in their browser as you scroll through it. It's just a presentation, though -- they can't edit or interact with the document. And once you stop the presentation, they'll no longer be able to see the document.
To use the feature, click the File tab and select Share --> Present Online. A screen appears with a URL that you send to others. Click Send in Email to launch your email client with the link already in it, or else click Copy Link and then paste it into whatever method you'll use to send the URL.
 IDG
IDG
To share a Word document online, send people a link, then start your presentation. (Click image to enlarge.)
Once your recipients have gone to the URL, scroll through the document, and they'll see the document exactly as you're seeing it. When you want to stop the online presentation, click the "End Online Presentation" button. That ends the presentation and disconnects the viewers from it.
Handy keyboard shortcuts for Word 2013
As in previous versions of Word, you can press the Alt key to see keyboard shortcuts for navigating the Ribbon tabs. For instance, Alt-H takes you to the Home tab, and Alt-G takes you to the Design tab. (For help finding specific commands on the Ribbon, see our Ribbon quick reference.)
 IDG
IDG
Using the Alt key helps you master the Ribbon. (Click image to enlarge.)
But there are many other keyboard shortcuts to help you accomplish a vast array of tasks in Word 2013. We've listed the ones we've found the most useful below. For even more shortcuts, see Microsoft's Office site.
Useful keyboard shortcuts in Word 2013
| Key combination | Action |
|---|---|
| Document navigation | |
| Ctrl-Up arrow | Move up one paragraph |
| Ctrl-Down arrow | Move down one paragraph |
| Ctrl-Right arrow | Move right one word |
| Ctrl-Left arrow | Move left one word |
| Ctrl-Home | Move to the top of the document |
| Ctrl-End | Move to the bottom of the document |
| Ctrl-G or F5 | Go to a page, bookmark, footnote, table, comment or some other location |
| Alt-Ctrl-Z | Switch among the last four places in the document you edited |
| Ribbon navigation | |
| Alt-F | Go to the File tab |
| Alt-H | Go to the Home tab |
| Alt-N | Go to the Insert tab |
| Alt-G | Go to the Design tab |
| Alt-JT | Go to the Table Tools Design tab |
| Alt-P | Go to the Page Layout tab |
| Alt-JL | Go to the Table Tools Layout tab |
| Alt-S | Go to the References tab |
| Alt-M | Go to the Mailings tab |
| Alt-R | Go to the Review tab |
| Alt-W | Go to the View tab |
| Text formatting | |
| Ctrl-B | Make text bold |
| Ctrl-I | Make text italic |
| Ctrl-U | Underline text |
| Ctrl-Shift-D | Double underline text |
| Ctrl-Shift-W | Underline a word |
| Ctrl-Shift-A | Make text all caps |
| Ctrl-Shift-K | Make text small caps |
| Ctrl-Shift-+ | Make text superscript |
| Ctrl-= | Make text subscript |
| Ctrl-Shift-> | Make font size larger |
| Ctrl-Shift-< | Make font size smaller |
| Ctrl-D or Ctrl-Shift-F | Open the font dialog box |
| Shift-F3 | Change the case of letters from upper to lower or lower to upper |
| Paragraph formatting | |
| Ctrl-L | Left-align text |
| Ctrl-R | Right-align text |
| Ctrl-E | Center-align text |
| Ctrl-J | Justify text |
| Ctrl-M | Indent a paragraph |
| Ctrl-Shift-M | Remove paragraph indentation |
| Ctrl-1 | Change to single-line spacing |
| Ctrl-2 | Change to double-line spacing |
| Ctrl-5 | Change to 1.5-line spacing |
| Ctrl-Shift-S | Open the Apply Styles task pane |
| Ctrl-Q | Remove paragraph formatting |
| Other useful shortcuts | |
| Ctrl-N | Create a new document |
| Ctrl-O | Open a document |
| Ctrl-S | Save a document |
| Ctrl-W | Close a document |
| Ctrl-F | Open the Navigation pane |
| Ctrl-H | Open the Search and Replace dialog box |
| Ctrl-P | Print a document |
| Alt-Ctrl-P | Switch to Print Layout View |
| Alt-Ctrl-O | Switch to Outline View |
| Alt-Ctrl-N | Switch to Draft View |
| Alt-Ctrl-M | Insert a comment |
| Ctrl-K | Insert a hyperlink |
| Ctrl-Shift-E | Turn revision tracking on or off |
| Ctrl-A | Select everything in the document |
| Ctrl-C | Copy selection to the clipboard |
| Ctrl-V | Paste from the clipboard |
| Ctrl-X | Delete selection and copy it to the clipboard |
| Ctrl-Z | Undo the last action |
| Ctrl-Y | Redo the last action |
Next: Ribbon quick reference