The inbox sure ain't what it used to be.
It's hard to even remember now, but way back in the prehistoric internet era of the early 2000s, an inbox was quite literally just an inbox — a place where your incoming email landed and waited for you to answer (or, perhaps more likely, ignore) it.
Now, following Google's recent repositioning of Gmail as a collaboration-friendly productivity hub, email is only one small part of what the inbox represents. The new Gmail setup is a mashup of email, one-on-one messaging, channel-driven team chat, individual and group video meetings, and even multiperson document work. It's a "new home for work," as Google puts it, and there's really no single point of focus — as the website's newly expanded left-of-screen sidebar makes immediately apparent.
 JR Raphael/IDG
The new Gmail interface, with Mail, Chat, Rooms, and Meet in the sidebar and a team conversation in the main area of the screen. (Click image to enlarge it.)
While the new Gmail interface can be incredibly powerful, though, it can also be a lot to wrap your head around — with numerous panels, subwindows, and layers upon layers of overlapping menus. And that means you're bound to overlook some useful stuff.
Well, overlook no more: This detailed guide will show you how to take full advantage of Gmail's most potential-packed teamwork possibilities, from the cross-service collaboration basics to some awesome advanced options. Just make your way through the steps below, share the info with your colleagues, as needed — and before you know it, you'll be a regular ol' inbox collaboration pro.
(Note that the tips here apply mostly to the desktop Gmail website, except where noted. Also, the new Gmail interface elements are currently available only for paying subscribers of Google Workspace — formerly known as G Suite — but Google says they'll roll out to regular consumer users, too, sometime over the coming months.)
Collaborating with Chat in the new Gmail interface
Google’s text chat function has been built into Gmail the longest, bearing many different names over the years. Now simply called Chat, it's more thoroughly integrated into the experience than ever but still does exactly what you'd expect: lets you have text-based chats with one or more people.
1. You can start a new one-on-one or group chat anytime by clicking the plus icon within the Chat section of the left-of-screen sidebar on the Gmail website. An important point to remember when starting any new conversation: One-on-one chats can include anyone with a valid Google account, while group chats are limited only to people within your organization (for paying Workspace subscribers) — though if you need a room with both internal and external members, there's a separate function for that, as we'll explore more in the next section.
2. Once you've started a new chat, it'll appear as a small window at the bottom of your inbox on the Gmail website. Pay close attention to the three icons in the window's upper-right corner: The underscore will minimize the window and show only the title bar, while the double-sided diagonal arrow will maximize the window and make it take up the entire inbox interface. The "x," meanwhile, will close the window entirely — though you can always open it again by finding and clicking the chat within the left sidebar.
 JR Raphael/IDG
Chats in Gmail show up as small windows to start but can be minimized or maximized from there. (Click image to enlarge it.)
3. You can't add more people into a chat once it's started, but you can create a new chat with the same set of people and then add more people into that mix. Just click the three-dot menu icon in the chat window's upper-right corner, select "Start a new chat," and then type in the name or email address of anyone you want to add in. When you've got the lineup finished, click the blue Create button at the bottom of the box.
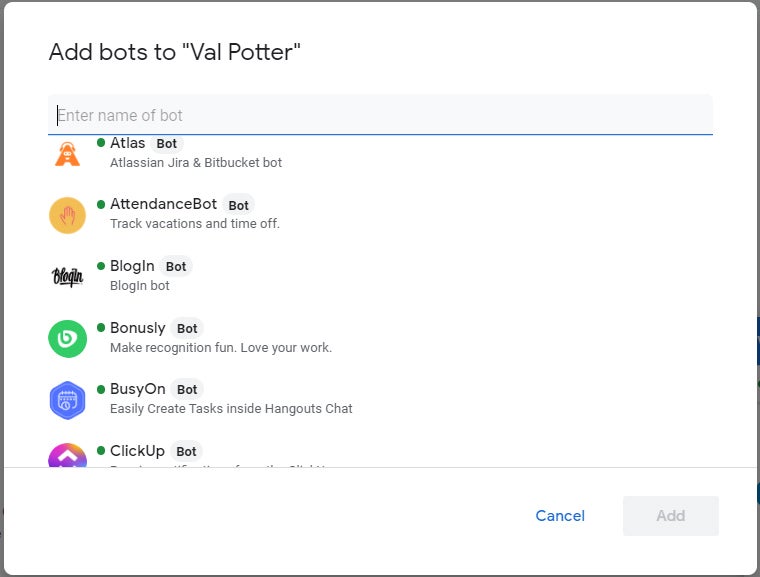
4. Also in the three-dot menu icon of every chat window is an intriguing option to add a bot into your current conversation. Some of the available bots are just silly distractions, but dig around, and you'll find some potentially helpful possibilities — such as bots that bring functions from Asana, Atlas, Salesforce, Trello, and Zapier into the environment. There are even official bots for both Google Meet and Zoom that'll let you easily schedule video meetings while communicating with colleagues.
 JR Raphael/IDG
The selection of Google Chat bots within Gmail range from genuinely useful to super-specific and sometimes even whimsical.
5. When someone sends you a Chat message you want to remember — or maybe break out into a longer thread for more detailed discussion — hover your mouse over that specific message in the conversation and look for the envelope icon that pops up. Click that, and the message will be forwarded into your inbox as an email.
6. If you want to create a transcript of an entire chat conversation (or a large portion of one), first go into your main Gmail settings — by clicking the gear icon in the upper-right corner of the website and selecting "See all settings" — and make sure the "Keyboard shortcuts" option in the first tab is set into the on position. (If it’s not, turn it on and click the Save Changes button at the bottom of the screen.)
Then highlight the messages you want to save with your mouse and press Ctrl (or ⌘), Shift, and the period key together. Go into any blank text field, in Gmail or in any other app, and hit Ctrl-V (or ⌘-V), and you'll see a nicely formatted log of all the messages, any links or attachments within 'em, and when exactly they were sent.
7. By default, all chats are saved in Gmail and easy to pull up again later. If you want to go off the record and not have a conversation saved, click the plus icon in the lower-left corner of a chat window on the Gmail website, then click the toggle at the left of the toolbar that comes up to turn that conversation's history off. Whenever the history is off, all messages will be deleted after 24 hours (though keep in mind that that affects only your end of the conversation; anyone else in the chat could still have their history enabled).
8. You'd never know it, but you can use some basic formatting commands while typing messages within chats in Gmail:
- For bold, hit Ctrl-B (or ⌘-B) — or surround your text with asterisks, *like this*.
- For italics, hit Ctrl-I (or ⌘-I) — or surround your text with underscores, _like this_.
- For strikethrough, hit Alt-Shift-5 (or Option-Shift-5) — or surround your text with tildes, ~like this~.
9. Feeling the need to be even more expressive? Just hit the colon key (:) while typing a message in any chat window. That'll pull up the hidden Gmail Chat emoji picker. You can then either scroll down to find what you want or keep typing to search for specific symbols (clapping, thumbs up, crying, or whatever it is you have in mind).
 JR Raphael/IDG
You can find any emoji you need by hitting the colon key while typing in a Gmail chat.
Collaborating with Rooms in the new Gmail interface
The distinction between Chat and Rooms is kinda confusing — heck, Google had to create an entire table to explain the differences — but the basic idea is that chats are for either one-on-one conversations or quick group conversations, while rooms are for more elaborate and ongoing collaboration among multiple team members on a specific subject (with built-in functionality for working on tasks, files, and different types of documents). Rooms are much more robust than chat windows, in other words, and are designed to be used more like channels in Slack or teams in Microsoft Teams.
10. To that end, you can include a mix of people from within your organization and outside your organization within a room (in a paying Workspace subscriber scenario) — but you have to make that decision at the start, when you're first creating the room. To do that, click the plus icon within the Rooms section of the left sidebar on the Gmail website, then select "Create room" and be sure to check the box next to "Allow people from outside your organization to join."
11. Rooms can hold multiple threads for even easier conversation organization. Anytime you're starting a new subject and want to split it off into its own separate thread, just click or tap the "New thread" button at the bottom of the room's window.
 JR Raphael/IDG
Rooms within Gmail can hold multiple threads for more organized conversations, whether you're accessing them from your phone or on a computer.
12. Just like Chat, Gmail's Rooms setup lets you forward any specific message into your inbox for reference or expanded discussion. Hover over the message and look for the envelope icon to make that happen.
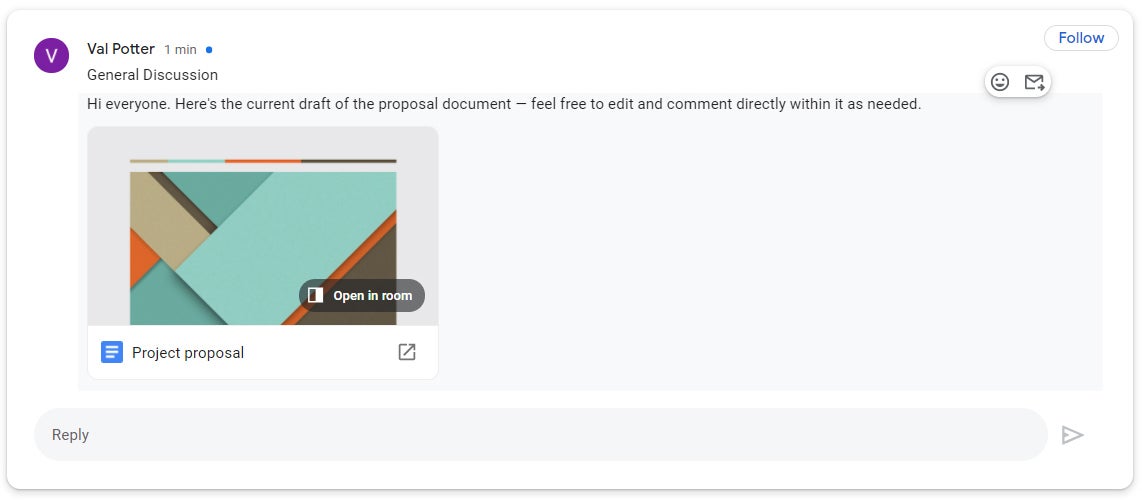
13. One of the most useful parts of the new Gmail interface is the way it lets you work on documents, spreadsheets, and presentations directly within a room — on the desktop, at least — without ever leaving your inbox. Just start typing a new message, then click the Google Drive icon and find the Docs, Sheets, or Slides file you want. The Gmail Rooms system will prompt you to update the file's permissions, as needed, in order to allow everyone in the room to access it...
 JR Raphael/IDG
When you add a document into a room in Gmail, the system will automatically prompt you to update its permissions. (Click image to enlarge it.)
...and then, it'll appear as a large thumbnail within the room.
 JR Raphael/IDG
A Google Docs document within a room in Gmail. (Click image to enlarge it.)
Clicking on the thumbnail from the Gmail website will open up a new panel right then and there where you can view and edit the file as if you were in the full, native Docs, Sheets, or Slides application.
 JR Raphael/IDG
You can edit shared documents, spreadsheets, and presentations without ever leaving Gmail. (Click image to enlarge it.)
14. The Gmail Rooms setup provides a dedicated Files tab where you can find every file — be it Drive-associated or just a regular local upload — that's ever been shared with a room. Just be sure you have the room in question maximized, then look for the Files tab at the top. If you click a file's name, it'll open in a new browser tab. And if you look to the right of a file's name, you'll find options for viewing the file within Drive and jumping to the exact area of the thread where the file first appeared.
15. The Tasks tab in that same top-of-room menu allows you to add tasks specific to that room's purpose and even assign 'em to someone else in the room. Assuming you have Gmail's keyboard shortcuts activated (see tip 7, above), that section also has its own special collection of hidden shortcuts:
- To add a new task, press Enter.
- To toggle a task between being complete and incomplete, press the spacebar.
- To edit a task, press Enter while that task is highlighted.
- To stop editing a task, press Esc.
- To delete a task, press Backspace.
- To move a task up or down in the list, hold down the Alt key and then press the up or down arrows.
16. Take note: The same tips about text formatting, emoji picking, and bot adding mentioned for the Chat area of the new Gmail interface also apply to Rooms.
Collaborating with Meet in the new Gmail interface
Videoconferencing is an ever-more important part of the workday, so Google has made it a snap to start and join Meet meetings from Gmail.
17. Don't overlook the "My meetings" option within the Meet area of the Gmail website's left menu. That'll automatically show you all Meet-based video meetings you have scheduled in Google Calendar and also give you a quick 'n' simple way to start a new meeting or join an existing meeting by typing in its code or nickname (even if it isn't on your agenda).
 JR Raphael/IDG
You can edit shared documents, spreadsheets, and presentations without ever leaving Gmail. (Click image to enlarge it.)
18. When you first open a new video meeting — while you're still looking at the preview of your own camera — click the three-dot menu icon in the upper-right corner of your video box. There, you'll find a nifty option to blur the room behind you and make yourself look at least a little bit sharper and more professional. (Hey, there's only so much special effects can do.)
19. Once you've joined an active meeting, click the three-dot menu icon in the lower-right corner of the screen to find that same background blurring option along with commands for activating noise cancellation, recording the meeting, activating on-screen text captions, and switching over to a phone for audio (in case your microphone isn't working).
20. Last but not least, click the "Meeting details" text in the lower-left corner of the video meeting screen. That'll show you the meeting's link and dial-in phone number, in case you need to pass it on to anyone else midway through.
Whew! All of that — and thanks to the beauty of remote collaboration, no one will ever even know that you're actually wearing bright red gym shorts beneath your professional upper half.


