Gmail's filled with hidden features and add-on possibilities, but one of the service's most powerful organizational tools is sitting right in the heart of its regular settings.
As you may have guessed by now (especially if you read this story's headline, you clever little cat), I'm talking about filters — Gmail's long-standing system for automating your inbox with a series of custom-crafted rules. At a glance, filters can seem complicated. They can seem overwhelming. They can even seem unnecessary.
But don't let yourself be fooled by the feature's curiously crusty exterior. Gmail filters have the potential to completely reshape your inbox and the way your incoming messages are handled. They can help you keep your email in order with no ongoing thought or effort. And all it takes is a little one-time planning to get them working for you.
Follow the filter-centric Gmail tips in this guide, and your inbox will be running like a well-oiled (but not too greasy) machine in no time.
Part 1: Figuring out your Gmail filters
Let's start by thinking through some Gmail filter possibilities to get an idea for the sorts of setups you might want to consider — then, we'll go step by step through the process of creating them.
With Gmail filters, you could:
- Ensure messages from specific high-priority senders always go into your inbox's Primary tab, where you're certain to see them
- Ensure specific sorts of lower-priority messages — like invoices, reports, or updates from different services you use — automatically get sorted into an out-of-the-way location and never even show up in your inbox
- Keep messages from annoying people out of your hair (but still available in case you need to find them) by automatically archiving them as soon as they arrive
- Forward messages from a specific address or with a specific phrase in their subjects to other members of your team or family
- Instantly respond to messages to or from a specific address with a prewritten template
- Mark specific types of messages from yourself as reminders by giving them a bright yellow "REMINDER" label that makes them stand out in your inbox
- Label messages sent to a specific variation of your Gmail address (like youraddress+vip@gmail.com) or written with a specific word or phrase in the subject (like "urgent," "important," or "hey jerkwad, pay attention to this") as "VIP" and then receive notifications only for messages with that designation
- Get a snickerdoodle delivered to your desk every time your boss emails you
All right, so that last one isn't really possible (not yet, anyway) — just wanted to make sure you were still paying attention. Everything else in that list, however, is absolutely doable and actually quite easy to set up with Gmail filters.
Got some ideas of your own? Good deal. Time to make 'em happen.
Part 2: Creating your Gmail filters
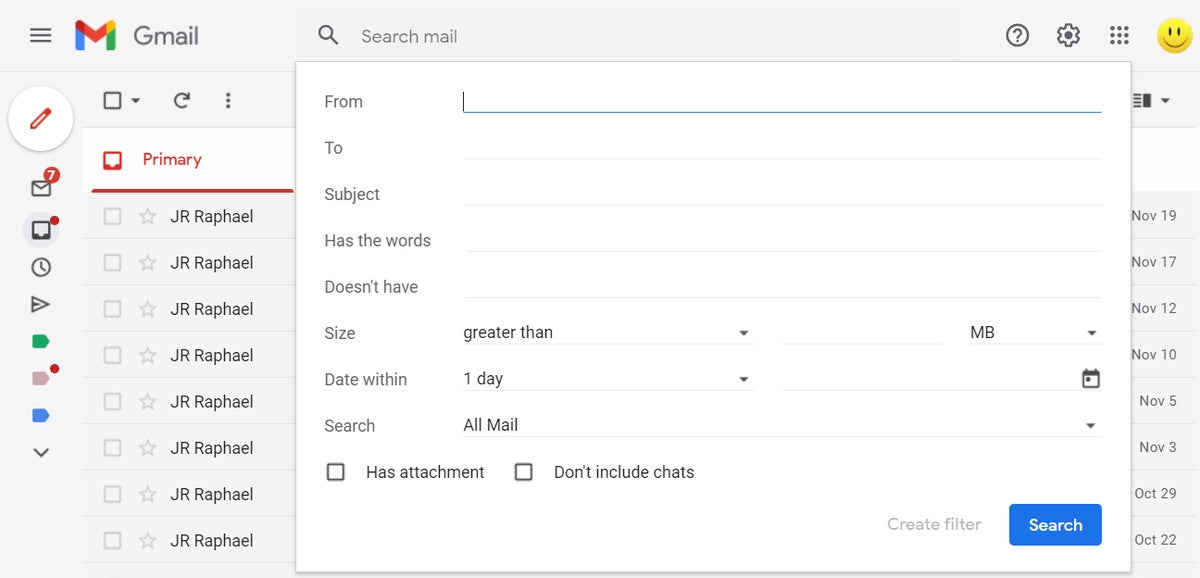
The simplest way to start a new Gmail filter is to click the control panel icon — the symbol showing three horizontal lines stacked on top of each other — within the big search box at the top of the Gmail website.
That'll pull up a form where you can fill in whatever you want to use as the basis for your filtering — a word or phase that might appear within an email's subject or body, an address from which a message could originate, or any other variable or combination of variables you like.
 JR Raphael/IDG
The form for creating a filter is filled with options for controlling email automation. (Click image to enlarge it.)
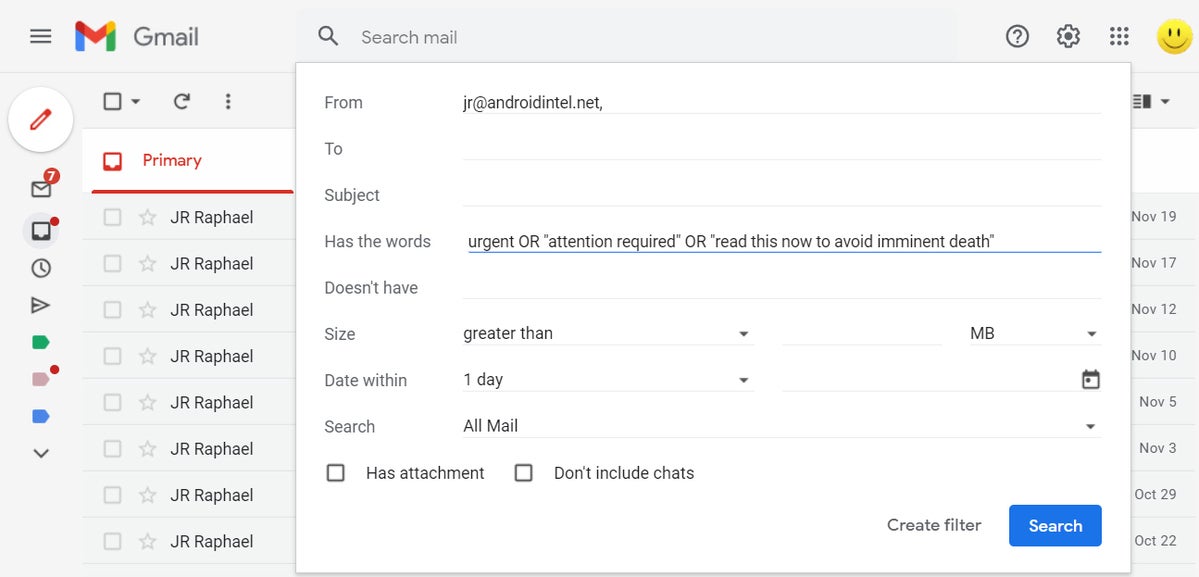
Fill in the fields as appropriate, using however many variables you want — even employing quotation marks around multiword terms along with operators like "AND" and "OR" between terms, if you really want to get fancy — and then click "Create filter" at the bottom of the box.
 JR Raphael/IDG
You can use any combination of variables, even employing operators within a single field, to control when your filter will run. (Click image to enlarge it.)
One quick warning: By default, your filter will apply to any and all incoming messages — hence the "All Mail" setting that shows up next to the "Search" option in the filter creation pop-up. If you change that option to "Inbox," you're likely to see an error message informing you that the parameters you chose are not recommended and may not work properly. Leave that "Search" option set to "All Mail" — which is probably what you want, anyway — and you'll steer clear of any errors and allow things to work the way they should.
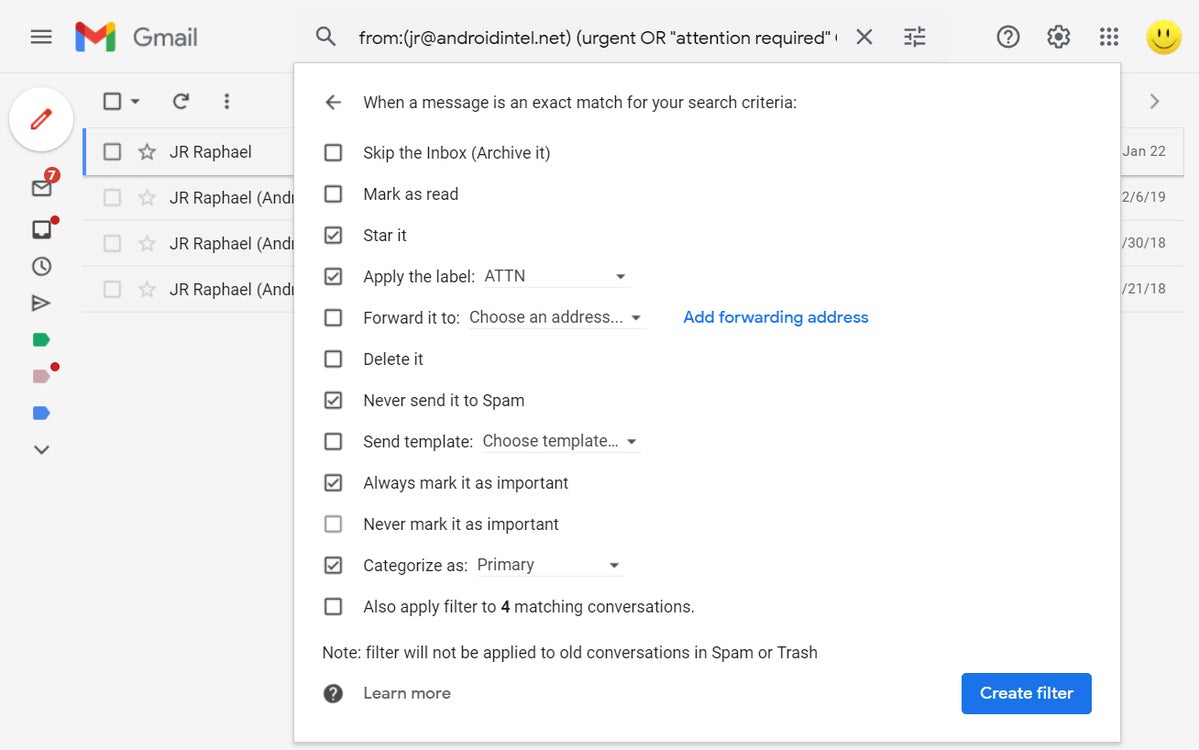
Now it's time for the fun part — the part where you decide exactly what happens when a message meeting your conditions arrives. You can select any combination of actions from the list and then configure them as needed. You can even tell Gmail to apply your filter retroactively to messages already in your account (as opposed to using it only for new messages that arrive from that point forward) by checking the "Also apply filter to matching conversations" option at the bottom of the box.
 JR Raphael/IDG
Gmail's filters include a variety of actions that can execute when your conditions are met. (Click image to enlarge it.)
Once you've got that finished, click the blue "Create filter" button — and that's it: Your new Gmail filter is officially in place and active. The next time any message comes in that meets the parameters you outlined, the actions you specified will automatically take place faster than you can say "I embrace Workspace in my workplace cyberspace."
Part 3: Managing your Gmail filters
Last but not least, make yourself a mental note in case you ever need to adjust your filters in the future: If you want to edit, delete, or even just revisit a filter you created, just click the gear-shaped icon in the upper-right corner of the Gmail website, click "Settings," then click the "Filters and Blocked Addresses" tab at the top of the settings screen. You'll see every filter you've ever created there and can tweak or remove any of 'em with a couple quick clicks.
Now if only we could find a way to get the filters to deliver those blasted snickerdoodles for us. Hey, Google: Any chance you can make that happen?
This article was originally published in October 2019 and updated in January 2022.


