Google's Chrome OS platform is in a near-constant state of change — and that means there's always something new and interesting in the works or maybe even lurking quietly in a corner of your Chromebook and waiting to be discovered.
Chrome OS updates show up every few weeks, in fact, and if you keep a close eye on Google's virtual kitchen, you can find some pretty tasty treats simmering and sometimes even ready to sample.
Here are six such fresh Chrome OS flavors either under development or already on their way to a Chromebook near you.
Chrome OS feature No. 1: Wireless file sharing
What it's all about
Our first new Chrome OS feature is the long-under-development Nearby Share system for sending and receiving files wirelessly between multiple Chromebooks or Chromebooks and Android devices. It was officially announced and rolled out on the Chrome OS side of things just last week, so it's still got that fresh 'n' steamy new-feature smell.
How to find it now
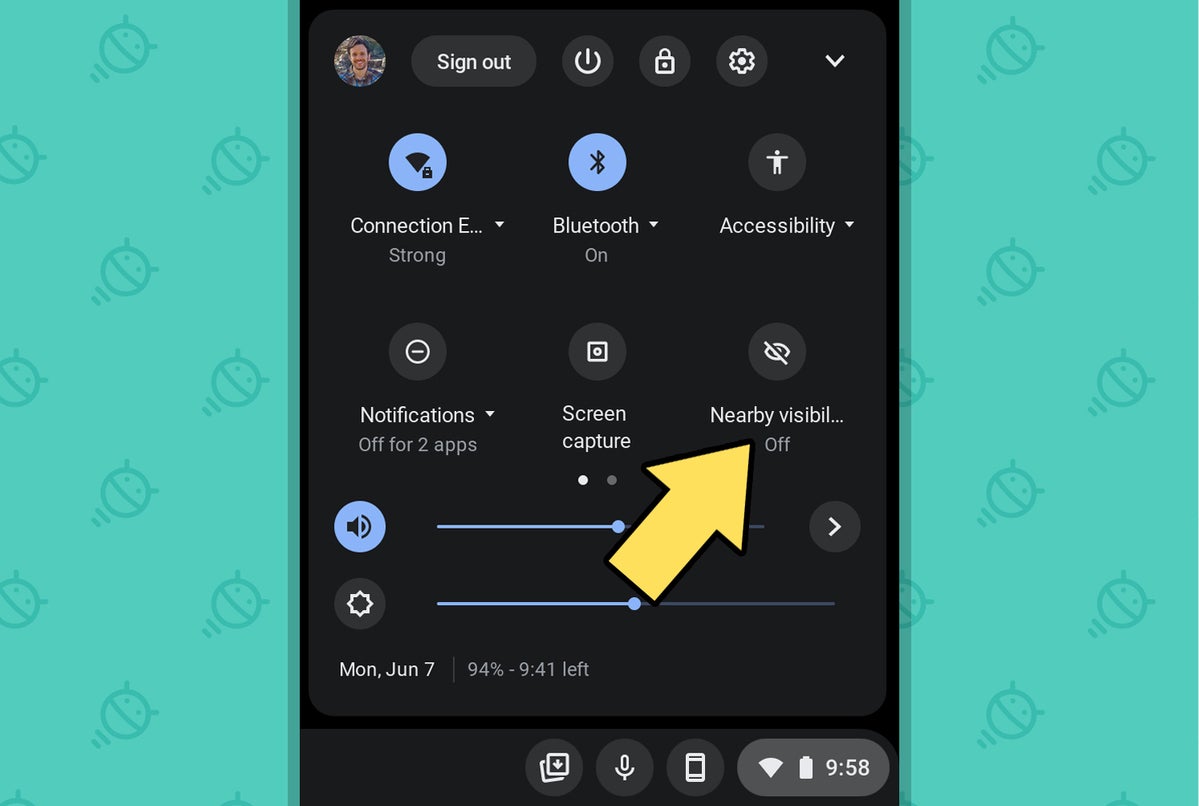
Click or tap the clock area in the lower-right corner of your Chromebook's screen to open up the Chrome OS Quick Settings panel. You should see an option there called "Nearby visibility" (because going with clear and consistent branding across all environments would clearly be too much for Google to handle). It also might actually say "Nearby visibil...." instead of "Nearby visibility," since, erm, those four periods apparently take up way less space than the three letters they're replacing.
 JR
JR Click or tap that, and then you'll see the actual Nearby Share settings configuration tool. There, you can fire the system up and then opt to keep your Chromebook visible to all of your contacts or just to a specific selection of people whenever your screen is on and the computer is unlocked. You'll also find a toggle that'll make the device visible to anyone in your area immediately for a five-minute window.
Either way you go, once your Chromebook is visible, all you've gotta do is pick up your Android phone — or whatever device you want to use for the sharing — and share an image or any other type of file you want using the normal in-app sharing process. On Android, look for the "Nearby Share" option in the standard system sharing interface, and you should see your Chrome OS device pop up as an option.
 JR
JR If you want to send files from your Chromebook to another device, meanwhile, open up the system-level Files app, select the file you want, and then look for the share icon at the top of that window. Select "Nearby Share," and as long as your other device is set to be visible, it should show up as an option.
 JR
JR Whee!
Chrome OS feature No. 2: Phone mirroring
What it's all about
According to some highly geeky signs in the open-source Chrome OS code, Google seems to be working on a feature that'd let you view your entire Android device's screen on your Chromebook, in real-time, anytime. Intriguing, no?
Fittingly, when I had the chance to chat with a couple o' Chrome OS bigwigs earlier this year, they hinted that such capabilities could be in the cards for the future.
"You’re just seeing the beginning," Google's Chrome OS product manager, engineering, and UX lead told me. "That little tiny Phone Hub real estate — I would put a big 'Watch This Space' on it, because there’s a lot of stuff we can and will do there."
Hmmmmmmmmmmmmmmm.
How to find it now
This one's still very early in development, so you can't try it out for yourself just yet. But its seeds sure do appear to be present in Chrome OS's core, and it's absolutely one to keep an eye on as the weeks tick by.
Chrome OS feature No. 3: A simple VPN switch
What it's all about
Chrome OS has technically supported the use of VPNs — or virtual private networks, those services that ensure your online activity is fully encrypted and safe from prying eyes — for quite a while now. Thus far, though, they've always involved a bit of an awkward setup that's relied almost entirely on third-party add-ons. Well, at some point recently, Google quietly added in a form of system-level support that makes it easier to switch any VPN you like on or off right from the regular Chrome OS interface.
How to find it now
First, you'll need to have an active VPN service available and installed on the device. And here's a little secret: Google's own Google One service, which comes with any paid Google storage upgrade, includes a free and quite effective VPN that'll actually work spectacularly on a Chromebook. The trick is simply to install the Google One Android app from the Play Store onto your Chrome OS computer.
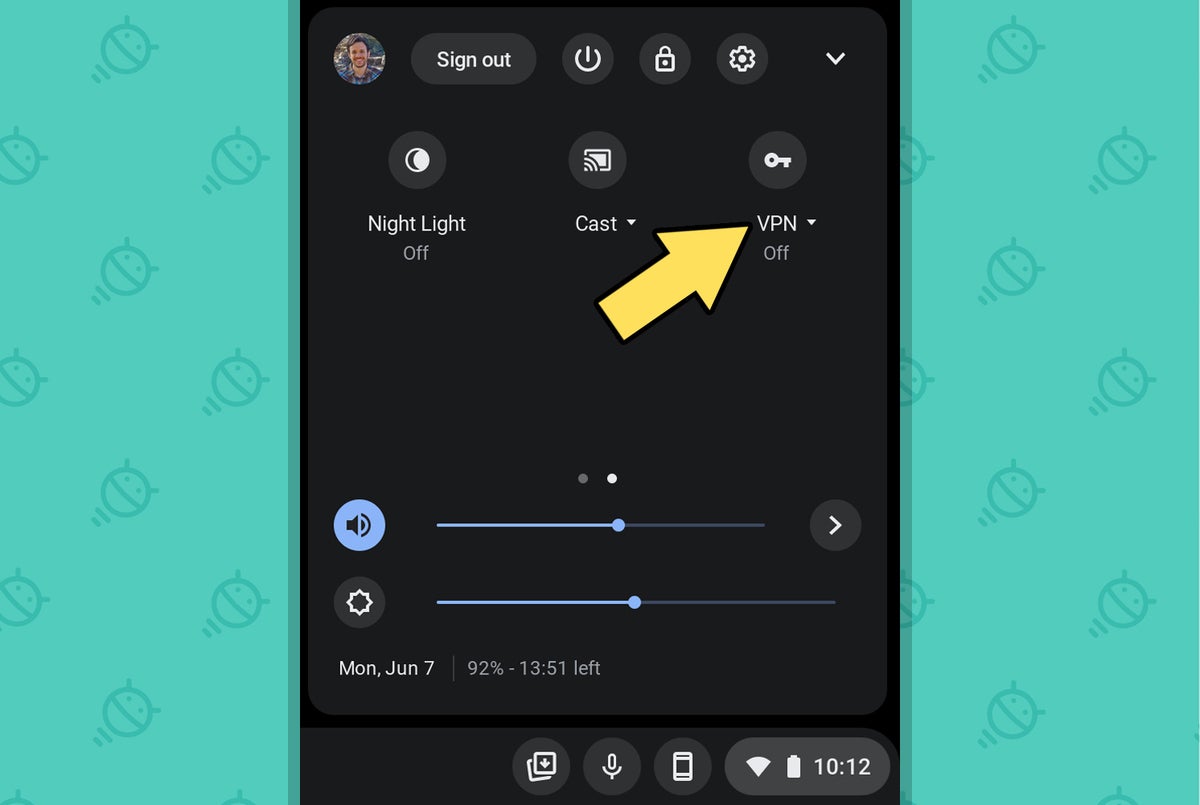
Once you do — or if you've got any other VPN configured, including one provided by your company — click or tap the clock area in the lower-right corner of your screen to open up that Quick Settings panel once more. Look for the "VPN" toggle; it might be on the first screen of options, or you might have to click or swipe over one screen to the right within your Quick Settings area to find it.
 JR
JR There, you should see Google One and any other available VPN options present and waiting to be enabled. Just click the plus sign next to whichever VPN service you want. You'll probably still be taken into that service's app to activate the VPN and get it going, but once you do, you'll see its status right there in the Quick Settings panel — and you'll have a quick 'n' easy way to turn it back off when you're done and then back on again when you need it next.
 JR
JR Progress!
Chrome OS feature No. 4: Live Caption
What it's all about
Live Caption is a system that lets you see real-time text transcriptions of any audio or video playing on your device, no matter what source or site it's associated with. We've had it on Android for a while now, and it's surprisingly useful beyond its surface-level accessibility purpose. The next time you want to "listen in" on a video, podcast, or any other type of content and you don't have headphones handy, it's an excellent option to keep in mind.
How to find it now
Live Caption has been in the midst of rolling out to Chromebooks for a solid couple of months, so it's possible it might already be on your computer. You can check by clicking or tapping the clock area in the lower-right corner of the screen, hitting the gear-shaped settings icon in the panel that comes up, and then typing the word caption into the search box at the top of the Chrome OS settings area.
If you see "Live Caption" come up as an option, click that, then click the toggle next to "Live Caption" on the screen you see next to activate it.
If you can't do that on your Chromebook, try the following steps to force-activate Live Caption on your system:
- Open up a new browser window and type chrome:flags into the address bar.
- Type caption into the search box on the screen that comes up.
- Click the box next to the line that says "Live Caption" and change its setting from "Default" to "Enabled."
- Click the box next to the line that says "SODA for Live Caption" and change its setting from "Default" to "Disabled." (Carbonation evidently doesn't agree with this thing.)
- Finally, click the blue Restart button at the bottom of the screen.
Once you've done that, search your system settings for caption once more, and you should see and be able to activate Live Caption for real this time.
And once that feature is activated, just go play any ol' video or audio clip you like — maybe this one? — and you'll see any words being uttered within it as text on your screen.
Just note that you'll need to go back and turn that toggle back off when you want Live Caption to stop. As of now, unfortunately, there's no Quick Settings toggle for doing that, so you'll have to mosey your way back into that same area of the Chrome OS system settings.
Chrome OS feature No. 5: A recycle bin
What it's all about
For all of its progress, one obvious-seeming element Chrome OS has yet to provide is a basic undo command for when you've deleted a file. Well, rejoice (and/or rejuice, if you're thirsty), for a Windows-style recycle bin is officially on the way.
How to find it now
You can give yourself the sanity-restoring recycle bin this very minute by following these simple steps:
- Open up a new browser window and type chrome:flags into the address bar.
- Type the word trash into the search box on the screen that comes up.
- Click the box next to "Enable Files Trash" and change its setting from "Default" to "Enabled."
- Click the blue Restart button at the bottom of the screen.
Now open up the system Files app — and well, well, wouldya look at that? Right there, in the left-of-screen navigation panel, is a newly present "Trash" option. Click that bad boy, and you'll have easy access to any file you've deleted in the past 30 days.
 JR
JR Hey, it only took a decade to get there!
Chrome OS feature No. 6: A better emoji picker
What it's all about
Speaking of simple and obvious omissions, one area where Chrome OS has remained curiously clunky over the years is in its handling of emojis — characters that might not be the most advisable additions to serious business communications but that we all find ourselves using at some point, even so. Typically, when you want to insert an emoji on a Chromebook and you're using the device in its laptop form — with a physical keyboard in place — the only real option you've got is to summon the virtual on-screen keyboard and then use its emoji-picking interface to find the face, finger, or suggestive vegetable symbol you need.
That gets the job done, sure, but it's a pretty inefficient and awkward way to accomplish something that oughta be easy — and that is easy on other desktop platforms.
Well, my fellow symbol-loving Homo sapien, a better method is upon us. It's just up to you to activate it.
How to find it now
To give yourself a major Chromebook emoji upgrade, take 10 seconds to perform the following actions:
- Open up a new browser window and type chrome:flags into the address bar. (Feeling familiar yet?)
- Type the word emoji into the search box on the screen that comes up.
- Click the box next to "System emoji picker" and change its setting from "Default" to "Enabled."
- Click the blue Restart button at the bottom of the screen.
Now, take a deep breath, click your heels together twice for good measure, and then right-click on any ol' text editing field, anywhere you like — a search box, the body of an email, or even just your browser's address bar. Look for the "Emoji" option in the menu that comes up.
Click it — click with gusto, damn it! — aaaaaand, ta-da:
 JR
JR That pretty little panel will pop up atop whatever text field you're typing into. You can also get it to appear without any clicking by remembering this shortcut: Whilst in any text field, press the Everything button (a.k.a. the Search or Launcher key — the one that's in the place where Caps Lock usually goes) along with Shift and the spacebar together.
There's really only one symbol that can sum up the sentiment this beautiful moment creates. Ahem — allow me:
🤯
Now, that's what I call succinct.
Want even more Googley knowledge? Sign up for my weekly newsletter to get next-level tips and insight delivered directly to your inbox.