Good news, my fellow Chromebook-carrying citizens: Google's ChromeOS platform is in the midst of getting a great new feature that's all about productivity — and odds are, you can find and enable it on your own favorite Chromebook this very second.
The feature ties into the ChromeOS Virtual Desks system. Remember that thing? It's the setup that snuck into our Chrome-colored lives a few years back. In short, the Virtual Desks option empowers you to spread your work across multiple environments within a single Chromebook computer. So, for instance:
- You might have one Virtual Desk that's all about your workday basics — things like email, Slack, and your favorite online Pac-Man game. (Hey, this is a safe space. We can be honest with each other!)
- You might then maintain a second Virtual Desk for your social media stuff (all strictly work-based, of course)...
- And you might then have two or three more Virtual Desks to hold all the apps and tabs related to whatever individual projects you're actively working on at any given moment.
That way, you can keep your digital day organized and isolated into different spaces — so that when you're working on one type of task or project, you can focus solely on the stuff related to that effort without having the apps and tabs from your other projects in your hair. And you won't be tempted to dip into your email or check your LinkedIn notifications whilst in the zone, since those things will be out of sight and in a completely separate section of your device.
It's a smart way to turbo-charge your productivity here in the land o' ChromeOS, and now, there's a tucked-away option that'll make the setup even more advanced and effective.
Ready?
[Psst: Love Googley knowledge? Get original tips in your inbox with my Android Intelligence newsletter. Three new things to try every Friday!]
The ChromeOS Virtual Desks expansion
My dear, allow me to introduce you to the brand spankin' new Chromebook Virtual Desks template option.
It's a pretty massive upgrade to the ChromeOS Virtual Desks system, and the way it works is so simple and so painfully obvious, you'll find yourself wondering how it wasn't there all along.
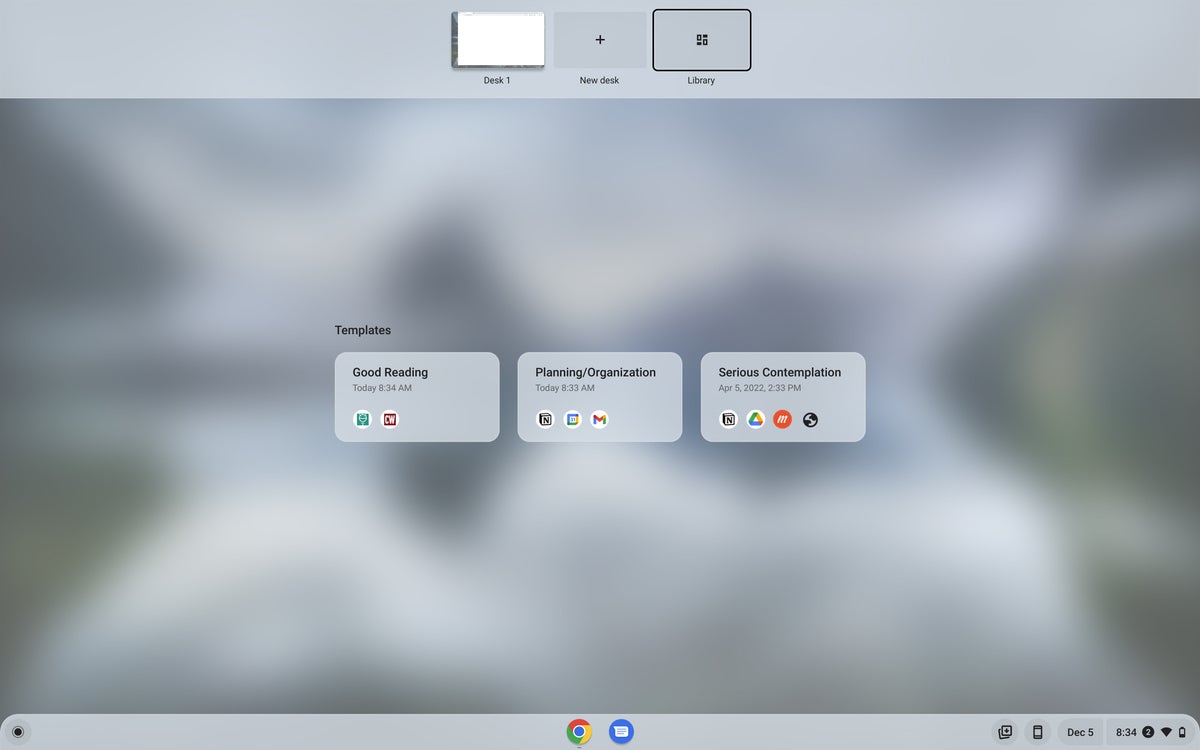
So here 'tis: With your Chromebook's new Virtual Desks template option enabled, anytime you head into the ChromeOS Overview mode — by tapping the square-with-two-lines key on your computer's top row or by swiping down from the top of the screen on a touch-enabled Chromebook — you'll see a snazzy new button that offers to let you "Save desk as a template."
 JR
JRHey, how 'bout that? Tapping that bad boy will store your complete current desktop for ongoing use. You can give it any name you want, and then anytime you want to reopen that same set of apps and tabs as a starting point, you can simply skip your way back into that ChromeOS Overview area, tap the "Library" button at the top, and then find and tap the template you created.
 JR
JRThat'll save you the trouble of opening the same stuff time and time again when you've got standard sets of apps and tabs you rely on for certain purposes. So, for instance:
- Maybe you'd create one template for your workday basics — your email, your Slack app, and that blasted Pac-Man game you can't stop playing.
- And maybe you'd then create a second template for scheduling and planning, with your calendar app of choice alongside your favorite note app and any company-wide project management services (Trello, Notion, and anything else your organization uses).
- Maybe you'd even create a generic template for starting up a new project, too, with stuff like Google Docs, Google Sheets, and any other pertinent programs.
You can create as many Virtual Desks templates as you want (in theory, at least; if there is a limit, I've yet to hit it!). And the system works hand-in-hand with the more ephemeral "Saved for later" Virtual Desks option — which seems designed more for short-term Virtual Desk saving, whereas templates are meant for indefinite ongoing use.
Pretty useful, wouldn't ya say? And now that you know it's available, there's just one more quick set of steps to summon it and get it ready for action on your own personal ChromeOS computer.
How to activate ChromeOS Virtual Desks templates
Here we go — I promise this is easy:
First, you'll need to make sure you have the current ChromeOS 108 software on whatever Chromebook's in front of you. The update has been rolling out for several days now, so it oughta be available on most any actively supported system.
To confirm:
- Click the clock in the lower-right corner of the ChromeOS interface, then click the gear-shaped settings icon in the panel that pops up.
- Click "About ChromeOS" in the menu on the left side of the main settings screen.
- Look at the version number under the ChromeOS logo at the top of the screen that comes up next. If it starts with the number 108, you're good to go! If it doesn't, try clicking the "Check for Updates" button to see if the update is pending and available to you.
Once you're sure you've got ChromeOS 108 on your computer, make your way through these four fast steps:
- Open up a regular new browser tab and type chrome:flags into the address bar.
- Type templates into the search box at the top of the screen.
- Click the box next to the line labeled "Desk Templates" and change its setting from "Default" to "Enabled."
- Click the blue Restart button at the bottom of the screen.
And that's it: Once your Chromebook restarts and brings you back to the main desktop view, open up any app or tab and then head into your Overview area (again, by tapping the box-with-two-lines-next-to-it key in your keyboard's top row or by swiping downward from the top of the screen with a touch-enabled system).
You should see your new Virtual Desks template tools right then and there. And all that's left is to remember to use 'em.
Told ya it was easy, right?
Take your efficiency to the max with my Android Intelligence newsletter. You'll get three new tips in your inbox every Friday and three bonus tips as soon as you sign up!


